Fixing a bricked AMD 7040 series Framework 13" laptop with $20 tools
In 2023, I was in need of a new laptop that should hopefully last me for a while. While looking at my options, I was seduced by Framework’s promise of a repairable and upgradable laptop that supports Linux out-of-the-box without weird driver issues, as well as the option to assemble the laptop myself1 and buy the RAM and SSD I want separately2, back when they were cheap.
For three years, the laptop has served me well, until Framework suggested via newsletter to install the latest BIOS3 update, version 3.20, with a bunch of security fixes. Unfortunately, the system hung and displayed a corrupt image on the screen, signifying a failed BIOS flash.
Naturally, I reached out to Framework support, who told me to unplug the laptop, let the battery drain, and power it back on again afterwards, hoping the laptop would recover by itself. Unfortunately, it never did, and after giving Framework a bunch of information, they informed me that since my 1-year warranty has expired, I have no option but to purchase a new Framework motherboard, which will cost at least CA$500.
A quick search revealed that many people had issues with BIOS flashes with this specific BIOS update on the Framework forums, even those in warranty, and on a different thread, people have been having similar issues with BIOS flashing in general on this model since at least March of 2025. To my knowledge, Framework has never acknowledged the issue or offered any indication that the problem was fixed, so buying a new motherboard would simply be playing Russian roulette if I ever wanted to update the BIOS again, on top of spending CA$500+ through no fault of my own.
Thus, I opted against buying a new motherboard and embarked upon a journey to flash the BIOS myself. I documented this journey in excruciating detail so that hopefully, by following along, you’ll understand exactly how you might fix similar problems.
Update (2026-08-22): This post showed up on the front page of Hacker News on 2026-08-18 and Framework finally acknowledged the issue when asked by Ars Technica and promised relief to affected customers. See updates.
Table of Contents
- Why Framework?
- The fatal BIOS flash
- Reaching out to support
- Troubleshooting on my own
- The BIOS chip
- The flash programmer
- Purchasing the tools
- Response from Framework
- The data breach
- Extracting the BIOS image
- Delivery of the tools
- Connecting the chip
- Executing the flash
- Consequences of flashing
- Conclusion
- Updates
Why Framework?
In 2023, my basic requirement for a laptop was as follows:
- Compatible with Linux;
- Small and light enough for travel;
- A standard US keyboard layout, not that horrible Canadian Multilingual Standard layout that’s somehow very common in Canada4;
- A modern CPU, but not necessarily super high core count, as I don’t intend to do intensive compiling or gaming while travelling; and
- Socketed RAM and SSD, so I can upgrade those down the line, or buy from a third party if it made financial sense. I wanted to start it at 32 GiB of RAM5 and 1 TB of SSD6, since those were reasonably affordable in 2023.
As such, my options are effectively limited to the 13” thin-and-light laptops without a discrete GPU. At the time, AMD Ryzen was ahead of Intel in the performance department, so I decided to go for an AMD CPU.
There were a plethora of 13” thin-and-light AMD Ryzen laptops that fit the bill, but since I didn’t need the new laptop right away, I figured I might as well try something new.
At the time, Framework was a relative newcomer on the laptop scene, promising a repairable and upgradable experience, along with swappable ports. I rather liked the idea of not being locked to the ports that the manufacturer decided to put onto the laptop, and I wanted more upgradability also. It definitely helped that Linux came with full first-party support and no requirement to run patched kernels or anything crazy like that.
Furthermore, Framework was a very big proponent of the right to repair movement, and I strongly believe that laptops should be repairable, like desktops, and not just thrown away after a minor problem, so I also wanted to support them on that front.
So I looked at the price premium for Framework, and it wasn’t actually that much more expensive once I opted for the DIY edition, sourced my own RAM and SSD, and skipped the pointless Windows licence. With another laptop brand, I would have to either buy the model with the lowest RAM and SSD and upgrade it to the 32 GiB of RAM and 1 TB of SSD that I wanted, or pay a premium for the manufacturer to put those in.
So I decided to just go for it and pre-ordered a Framework laptop, and it finally arrived a few months later to much anticipation. I simply slotted in the RAM and SSD, connected the input cover, screwed it in, installed the bezels, and that was it. It honestly felt a bit anti-climactic for a DIY laptop. I then put in a Debian netinst USB drive, and I was off to the races.
For the next three years, I actually had a relatively nice experience, and the AMD Ryzen 5 7640U with Radeon 760M Graphics was still plenty fast for what I needed the laptop to do. There was definitely no need to upgrade, though I could, in theory.
The fatal BIOS flash
For the longest time, Framework appeared to be a very consumer-friendly company,
providing regular BIOS updates and an easy way to install them on Linux through
the Linux Vendor Firmware Service (LVFS) and fwupd. In fact, I am
subscribed to Framework’s newsletter, which informs me of any updates coming
out.
I’ve done many BIOS updates on Framework through fwupdmgr update, and save for
the annoyance of rebooting the laptop and waiting like ten minutes for the BIOS
updater to finish flashing, nothing bad has ever happened.
On July 7th, 2026, Framework sent me the following email:
From: Framework <support@frame.work>
Subject: Software update for your Framework Laptop 13 (AMD Ryzen™ 7040 Series) - BIOS 3.20We have a BIOS update for your Framework Laptop 13 (AMD Ryzen™ 7040 Series). We recommend always installing the latest version of BIOS and drivers to keep your system secure, stable, and running at high performance.
- BIOS 3.20, with updaters for Windows and Linux
- Added support for Framework Laptop 13 Pro features - Enabled compatibility for the haptic touchpad, touch panel, and 74W battery.
- Updated the audio verb table to support the new speakers in the Framework Laptop 13 Pro chassis.
- Updated AMD PhoenixPI-FP8-FP7_1.2.0.0f.
- Fixed an issue where the system was unable to boot from partially locked self-encrypting drives (SEDs).
- Fixed an issue where the Battery Extender status was reported incorrectly following a reboot, hibernation, or shutdown after the timer had expired.
- Fixed an issue where the system boots with black screen when a Dell U2725QE monitor and a mouse were connected.
- Supported 16bits postcode.
- Fixed an issue where system audio volume was lower on 3.19 beta.
- Security fixes
- CVE-2025-54502 - CVSS score N/A.
- CVE-2025-29949 - CVSS score N/A.
- CVE-2025-0040 - CVSS score N/A.
- CVE-2024-36355 - CVSS score N/A.
- CVE-2024-36310 - CVSS score N/A.
You can learn how to check your current BIOS version, see the full details on the updates, and always get access to the latest software on the Framework Laptop 13 (AMD Ryzen 7040 Series) downloads page.
However, I suspected that flashing a BIOS right away might not be a good idea, given the potential for bugs, so I decided to wait for a bit. I figured that if there were problems, either a new update would be released, or the update would be pulled. Seeing neither, I finally decided to do a quick flash in the morning of August 5th, while I cooked breakfast.
However, when I came back, I saw this screen, and instantly knew something had gone horribly wrong:
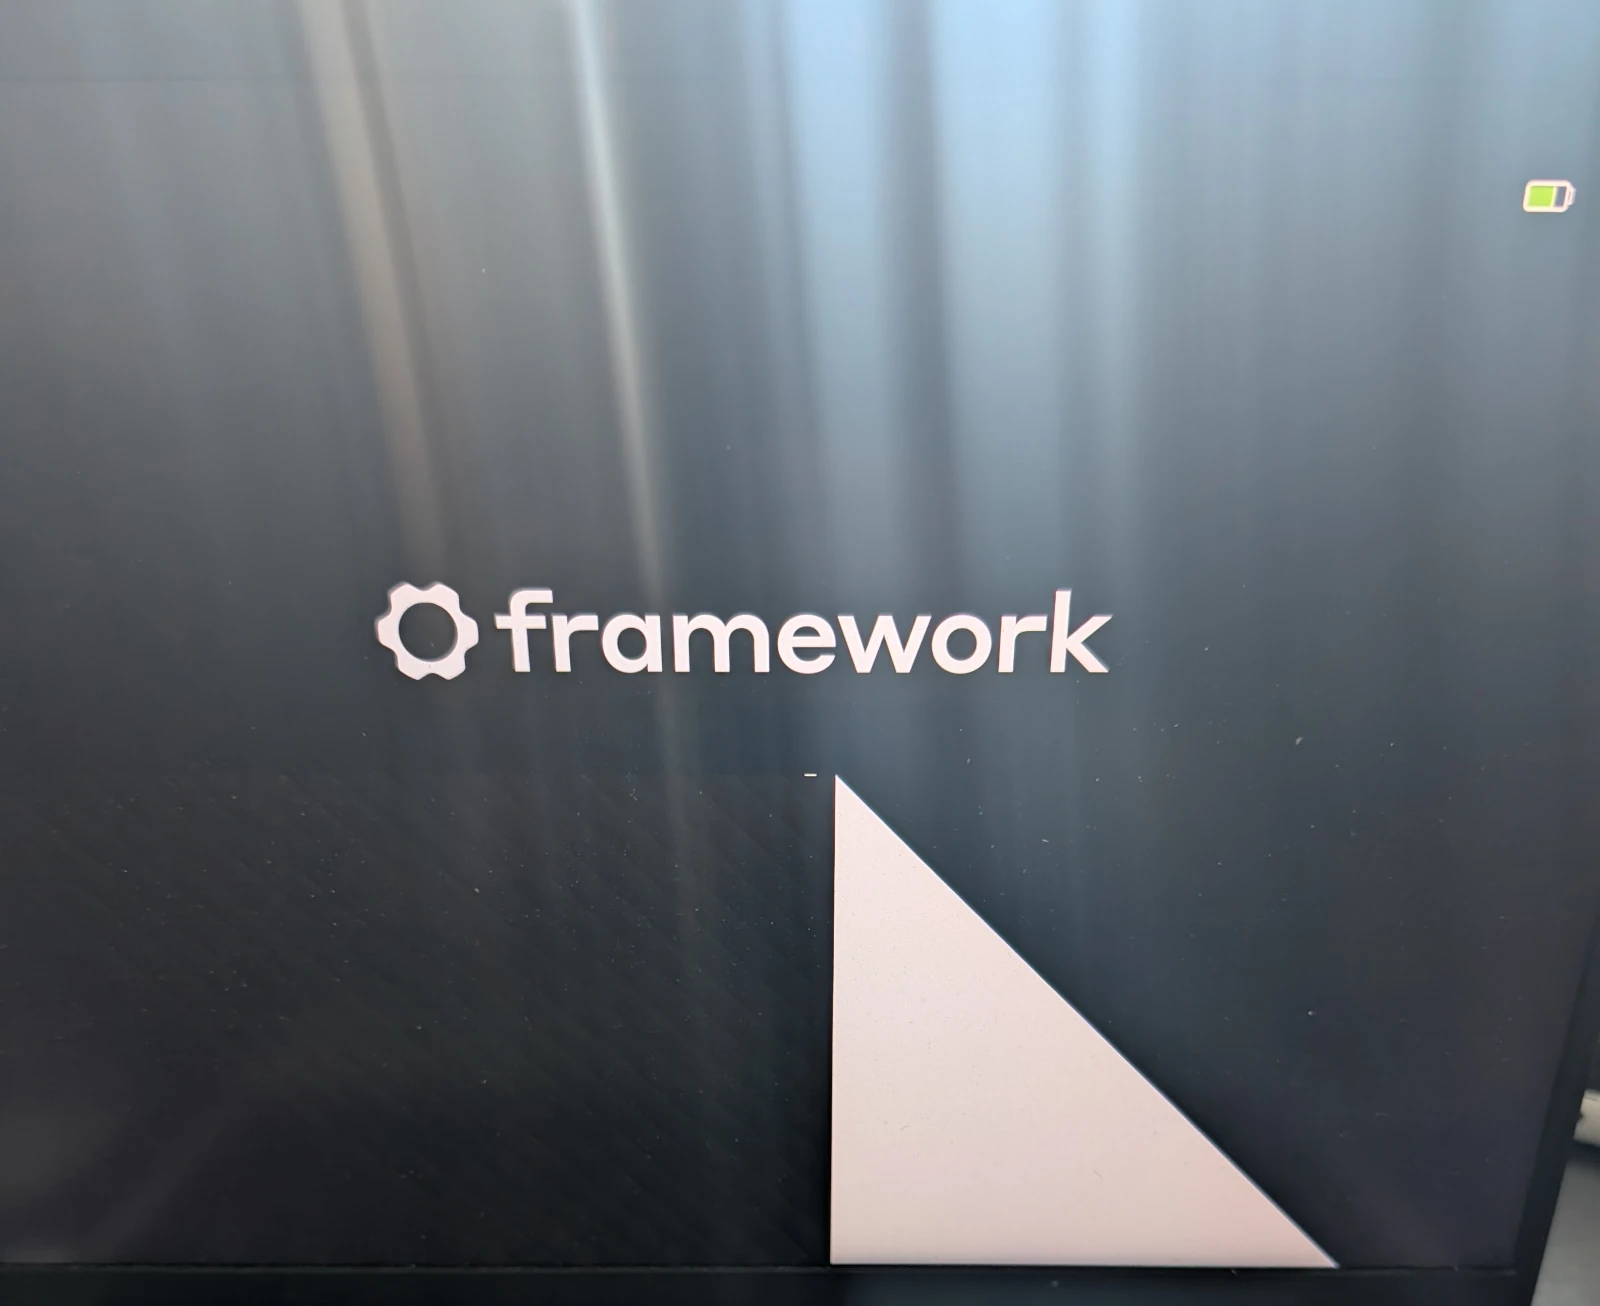
Framework BIOS flasher showing a triangle and diagonal patterns it’s not supposed to show7
Given that the BIOS flasher was stuck and probably rendering random stuff from memory to the screen, I have no choice but to conclude that the BIOS flash had failed.
Still, I left the laptop for a few hours, just in case it decided to recover. It never did.
Reaching out to support
Naturally, I reached out to Framework support, hoping for a quick response and a solution to my problem:
Subject: Stuck on BIOS Update
Support Request Category: Problem with my Framework Product
Was your Framework Product Delivered within the last 30 days?: No it wasn’t
Product: Framework Laptop 13
Framework Laptop 13 Generation: AMD Ryzen 7040 Series
Operating System: Linux
Linux Distribution: Debian 12 [typo, should have been 13]
BIOS: 3.20
Order number: [redacted]
Product Issue Selection: Mainboard
Description: I tried to update the BIOS with fwupdmgr update, and upon reboot, the system is stuck in this weird state and not making any progress for over an hour at this point. It’s not displaying properly, see picture. What do I do now?
I’ve also attached that picture of the screen above.
Support did not respond until one day and 8 hours later.
Troubleshooting on my own
In the meantime, I figured that letting the computer hang indefinitely—especially with the CPU fan spinning loudly—wasn’t the best idea, so I decided to do some research. It wasn’t very long before I came across this thread, with a bunch of people having the same problem doing the same update to BIOS 3.20 from 3.18, just like I did, though I saw a slightly different screen.
Users on the thread who were under warranty reported getting their motherboard replaced, while those out of warranty reported Framework offering zero help. This was very concerning to me.
Seeing on that thread that support recommended that people in a similar situation unplug the charger and let the battery drain until the laptop eventually powers off, I did exactly that, while diving deeper on the forums to see what was in store for my future.
I then came across this other thread, wherein the forum user @cesfahani, who saw the exact same screen I did, detailed how they used their Raspberry Pi and soldering skills to flash the BIOS chip externally. While I could do some basic soldering, as seen when I built my stratum 1 NTP server8, I was not prepared to solder tiny wires to a tiny BIOS chip.
It soon became apparent to me that if BIOS flashing on Framework fails and it doesn’t automatically recover by itself, there was no recovery mechanism short of externally programming the BIOS chip. This was shocking on a product advertised as “repairable.”
I couldn’t help but remember my first PC, secondhand as it was, with the
2004-vintage P4P800 SE motherboard. I still remember reading the
manual from front to back, as an excited child with zero desire
to break my very first PC. Even the 22-year-old motherboard had the ASUS
“CrashFree BIOS 2” feature, which was advertised to fix a bad flash without
resorting to such crazy manual methods. I’d simply have to put in a floppy
disk9 or a CD with a BIOS image named P4P800SE.ROM after a bad flash,
and it would automatically recover. Yet, here I am decades later, dealing with a
“repairable” laptop without such a feature.
I also wondered whether such a thing was specific to laptops, so I did a quick search on whether the brands that I didn’t choose back then, like Dell and HP, supported such recovery features. For example, Dell laptops could recover the BIOS from USB or the recovery partition after holding down Ctrl+Esc while plugging in the power, and HP laptops have a similar “HP Sure Start” feature that recovers the BIOS. So Framework is actually doing worse than their “not-repairable” competitors on this front.
Fortunately, reading further down the thread offered a glimmer of hope: Instead of soldering tiny wires to the chip on a Raspberry Pi, forum user @moparisthebest revealed that I could use something called “pogo pins” connected to a USB flash programmer to do the job without any soldering. Even further down the thread, users @David_Henry and @Richard6 reported success doing something similar.
The BIOS chip
Before we go any further, it is important that we first understand the BIOS chip that we are dealing with. Otherwise, talks of flashing it would just be a confusing mess of jargon, which was my experience when first reading the thread.
The flash chip in question is located to the right of the M.2 slot, hidden under a plastic cover, and it looks like this (rotated 90° clockwise to make the label upright):
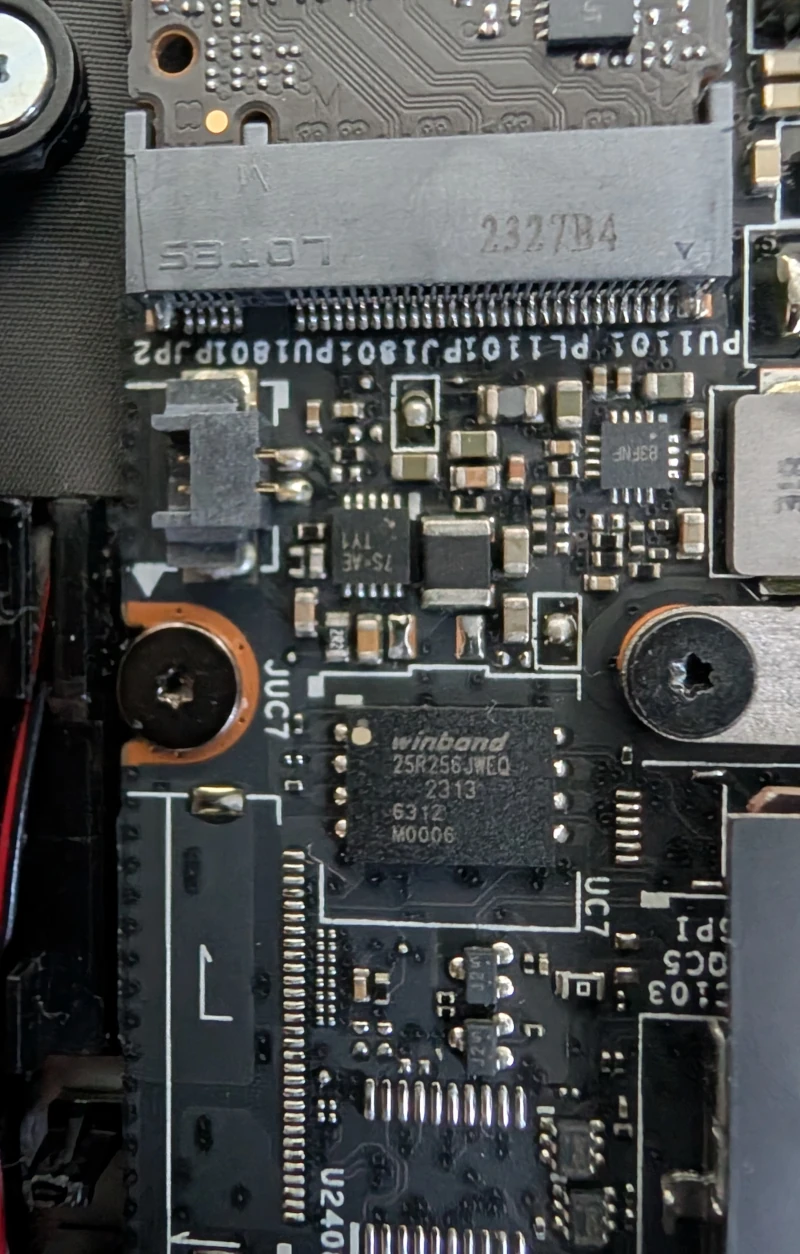
The BIOS chip in question, with the M.2 slot for scale
As you can see, this is a Winbond 25R256JWEQ chip. I found the datasheet for the W25Q256JW series, and discovered the whole series to be 1.8 V, 256 M-bit (i.e. 32 MiB) SPI flash chips. It will be very important to find a BIOS image for this motherboard that is exactly 32 MiB, then flash it at exactly 1.8 V to avoid destroying it.
What’s SPI? It’s a de facto standard called the Serial Peripheral Interface, commonly used in embedded systems for communication between integrated circuits. This standard is why the Raspberry Pi could talk to and flash the chip, as could many microcontrollers.
There are several variants of the W25Q256JW chip, differentiated by form factor:
- the
Pvariant, which is an 8-pad, WSON 6×5 mm chip; - the
Evariant, which is an 8-pad, WSON 8×6 mm chip; - the
Fvariant, which is a 16-pin SOIC 300-mil chip; and - the
BandCvariants, which are ball grid array chips.
We have the E variant here, which means it’s a WSON 8×6 mm chip. From the
datasheet, we can see its schematic:

Pinout schematic for Winbond 25R256JWEQ chip
It’s also very important to note the white dot on the top-left corner of the chip, as shown in the picture and on the pinout schematic. That dot is placed next to pin 1 of the chip, allowing it to be oriented. Very bad things will happen if you rotate the chip the other way and connect VCC to GND instead.
Now, you might wonder: what’s a WSON? It’s short for Very, Very-thin Small Outline No-lead, a form factor for chips. I guess VVSON sounded silly, so they called it WSON. It’s pretty much the worst form factor for external flashing.
If Framework had used the SOIC (small outline integrated circuit) form factor instead, it would have been possible to clamp onto the chip and flash it that way, but the WSON form factor has basically nothing to clamp onto. Instead, we can either:
- try to desolder the chip, which requires a hot air station, as there’s a big ground pad underneath the WSON chip for which a soldering iron wouldn’t work; or
- program it in-circuit (without desoldering) by using a probe with “pogo pins,” which are spring-loaded pins.
A pogo pin probe consists of a piece of plastic with an indent exactly the size of a WSON chip. Around the indent are spring-loaded pins that go through the plastic. To use the pogo pin probe, the plastic should face downwards, and the chip should fit into the indent. Then, downward force can be applied so that the pins go through the plastic and make contact with the solder balls. This downward force must be maintained for the entire duration of the flash operation, or data will be corrupted.
On the BIOS flashing thread, users have used various heavy objects to maintain contact while the flash happens. Unfortunately, I don’t have random heavy ceramic objects lying around at home, so realistically I’d have to hold down the pogo pins manually. This makes it imperative that the flashing happen quickly, and you shall see the consequences of that later.
Also notice the white lines around the BIOS chip? That is called a “silkscreen” in PCB terminology, and marks positions where components could be mounted. Judging from the shape, the motherboard could have been soldered with a socket for a replaceable BIOS chip, and then to fix the laptop, I could have either:
- bought a new chip with the correct BIOS from Framework; or
- taken the chip out and put it into a flasher without using janky mechanisms like pogo pins.
However, once again, the “repairable” laptop company has chosen to close off an avenue of repair.
Furthermore, there is clearly space on the board for a flash header connected to the BIOS chip, and I could have simply connected to that with a bunch of jump wires (sometimes called “DuPont” wires) instead of using pogo pins. There was also enough vertical clearance due to the height of the M.2 slot. Again, Framework chose the user-hostile option.
The flash programmer
Now that we understand the BIOS chip and that we must connect to it with a pogo pin probe, it’s time to talk about what we need to talk to the chip and program it.
Since we wanted something nice and integrated, it makes sense to get a flash programmer that works over USB. There are several popular options for this, each with their own advantages and disadvantages. I will go through some of them here.
The CH341A mini programmer
This is probably the most popular option and what most people on that Framework forum thread used. It is very cheap on AliExpress and costs US$3 on its own at the time of writing, so it’s a very affordable option. The CH341A chip itself works at 3.3 V and 5 V, so to use it for 1.8 V devices like the Winbond 25R256JWEQ, we need to use a 1.8 V level shifter.
Unfortunately, as forum user @jim_m noted on the thread, the cheap CH341A mini programmers, especially those with black PCBs, have issues with voltages on the data pins. While they would power the chip (or the level shifter) at 3.3 V, the data pins remain at 5 V, which is not very good for the health of anything connected to it. However, many other users reported no problems with it. To settle this debate once and for all, I decided to order one for myself and test it out, given how cheap it is.
When it arrived, I plugged it into my multimeter, following the instructions from this blog, which contained instructions for fixing this issue without soldering, as well as checking whether the problem exists and whether it is fixed:
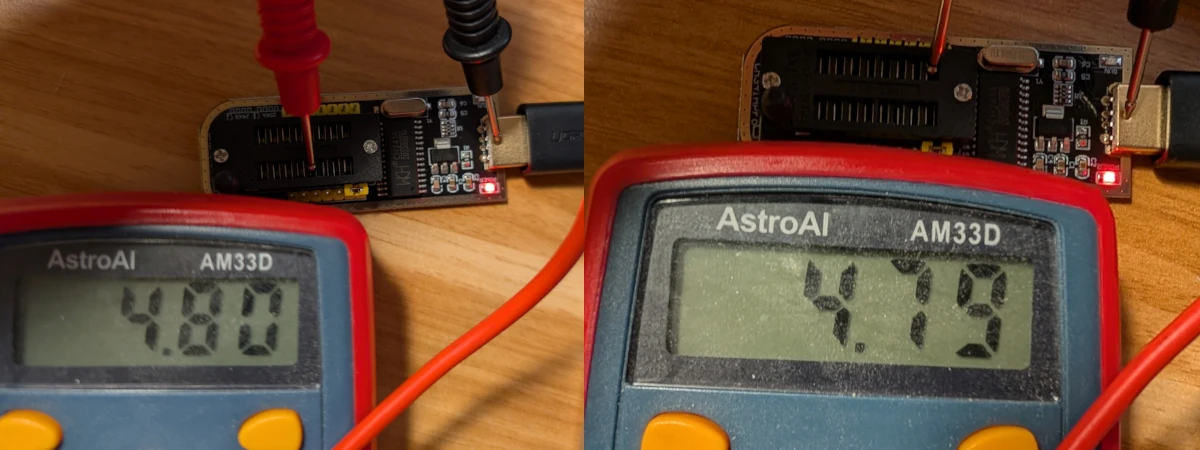
Multimeter measuring the voltage of MOSI and MISO pins on the CH341A mini programmer, which are supposed to be 3.3 V
Well, I guess it is true that the black PCB variants are problematic.
It is believed that the variants of the CH341A with a voltage switch between 5 V, 3.3 V, 2.5 V, and 1.8 V do not have this bug. The same video claims that the 1.8 V level shifter would shift the 5 V on data pins to 1.8 V anyway, but I don’t know if I trust that or whether that is good for the health of the level shifter.
I opted against experimenting further due to the other major disadvantage of the CH341A, that being its speed. From the datasheet of the Winbond 25R256JW series, we can see that it runs at a maximum of 133 MHz for the SPI clock. However, the CH341A, according to resources found online, can only do up to 1.7 MHz, if not slower. People on the forum thread reported that it took around 5 minutes to read, and another 5 minutes to write the 32 MiB BIOS chip. I certainly have zero intention of holding down the pogo pin probe for that long.
The CH347 “high-speed” programmer
The CH347 is a newer programmer that’s the spiritual successor to the CH341A. With a 15 MHz SPI clock, it can program chips much faster than the CH341A. The socket on the programmer is supposed to be compatible with the CH341A and serve as a drop-in replacement. Unfortunately, documentation for it is scarce. Still, I was able to piece together that it was a 3.3 V device.10
After it arrived, I was able to confirm that it was sending 3.3 V on the data pins, unlike the CH341A:
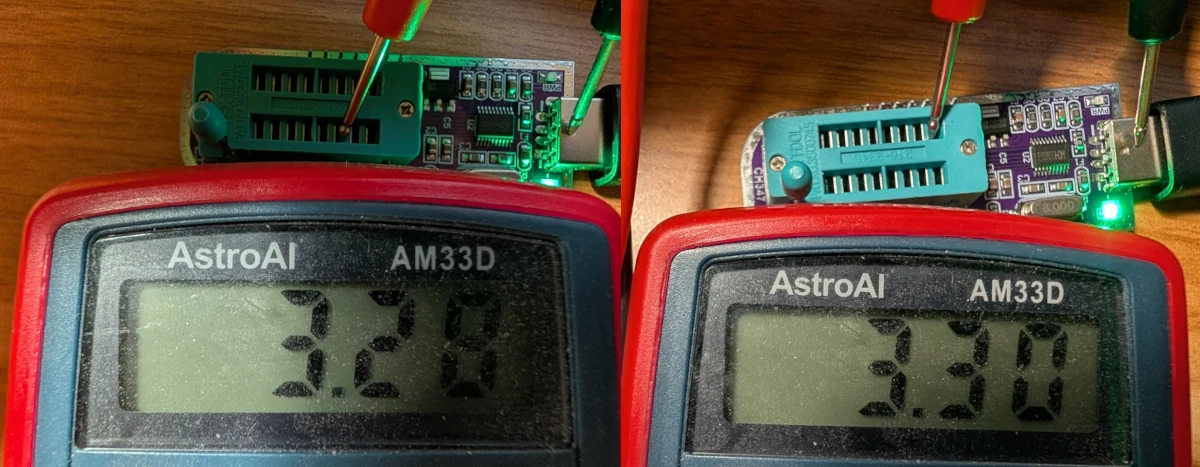
Multimeter measuring MOSI and MISO on the CH347 Programmer, showing the expected 3.3 V on data pins
That certainly inspires a lot more confidence. With its faster flash speed, I also wouldn’t have to hold down the pogo pins for as long, which is a win in my book. This is the programmer I intended to use for the project.
The XGecu T48
A user on the thread reported success with the XGecu T48 programmer. However, after seeing the price tag of over $100, I immediately decided it was too expensive for this repair.
Purchasing the tools
Armed with knowledge of what I needed, and not holding my breath for Framework to fix my system, I decided to just order the parts on AliExpress, since it’d take a while to arrive. Ultimately, I chose to buy the following parts:
- A full set of the CH341A programmer plus tools like the 1.8 V level shifter, clips, and other tools for any flashing needs I might have in the future for US$7.59 (listing contains an option for just the level shifter);
- A CH347 programmer for US$4.99;
- A WSON8 6×8mm pogo pin probe for US$7.83.
This cost a grand total of US$20.41. Note that to achieve this price, I had to buy some other, unrelated items that I was planning to buy anyway.
Also note that I bought the CH341A to see whether the new black ones still have the voltage bug; it’s not something actually needed for this project. I probably would have saved some money by only buying the level shifter, which is the only part I actually needed from the CH341A kit. It’s available on the same listing for US$2.23 at the time of writing. Still, I figured the rest might come in handy some other day.
Also note that I didn’t need the laptop urgently, which was why I was willing to save a buck ordering on AliExpress, knowing it would take 1–2 weeks to deliver. If you need to fix your laptop urgently, perhaps Amazon Prime same-day shipping would more tempting, though it would naturally cost more.
Response from Framework
After I did all this research, Framework finally responded to me, telling me to unplug the charger and let the battery drain, then try booting again—which was exactly what I did earlier, and the laptop wouldn’t turn on. My laptop was officially “bricked” at this point—as in, it’s effectively a very expensive brick.
So I told Framework this, and they asked for a bunch of information and offered some more troubleshooting steps. Here are my responses:
Which BIOS version were you on & which version were you updating to? (Example: Was on BIOS 3.09 updating to BIOS 3.18)
I don’t remember, but I believe I was on 3.18. I know it was updating to 3.20.
Was the BIOS version you were updating to in Alpha, Beta, or Stable release? (If downloading from our Knowledgebase, it is a Stable release. If from our Community Forum, it should say which release it is in the title)
This would be the stable BIOS, although it was downloaded from LVFS.
What Blink Codes is your device showing when attempting to power on your device? (If this could be video recorded and shared with us, it would be greatly appreciated)
A video has been attached (blink.mp4), shrunk down to 144p to save space. To my eyes, it’s 12 green flashes, 1 red, 1 green, 1 blue, 1 green, 2 blue, 8 green, 2 blue.
Can you please share a picture with us of the Front of the Mainboard?
See mainboard.jpg
Can you send us a photo of the laptop showing all sides while the lid is closed (left, right, top, bottom, front, and back)? See the image below for reference.
See other jpg attachments.
For troubleshooting:
- Disconnect the system from AC power.
- CAREFULLY disconnect the battery and leave it disconnected for 30 minutes for the best chance of recovery.
- CAREFULLY reconnect the battery.
- Reconnect AC power.
- Attempt to boot the system.
I did this. No change, same light pattern.
I will not reproduce the attachments here, but suffice to say, the laptop looked fine physically.
Framework then responded on 2026-08-07 at 05:49 EDT:
Thank you for your response and for sending the photos. We appreciate it.
After a thorough review of this issue and the photos/videos submitted, we’ve come to the conclusion that there is a need to replace the Mainboard.
Unfortunately, we are unable to provide a replacement as your warranty has already ended.
We suggest purchasing a replacement in the Marketplace.
You can check our Warranty and Terms of Sale below.
Framework Warranty - https://frame.work/warranty
Framework Terms of Sale - https://frame.work/terms-of-saleWe know that this is a bit disappointing, and we sincerely apologize for the inconvenience.
If there’s anything else that we can assist you with, please don’t hesitate to contact us.
Thanks for your understanding. Have a great day!
Regards,
Framework Support
So basically, after being encouraged to update the BIOS by Framework, Framework told me that because my warranty has expired, I have no other option but to throw away the entire motherboard, including the perfectly working but soldered CPU, and buy a replacement for over $500 on their store.
How does it make sense that some bad data on a BIOS chip that retails for US$5 should force me to buy a whole new board and CPU for $500+? Especially when this happened as a result of Framework’s own instruction? Especially when many users have complained on the Framework official forums without anything being done to stop further instances of bricking?
Worst of all, Framework didn’t offer any help in attempting a repair myself, not documentation, not a schematic, not even a raw BIOS image for me to attempt to flash externally. So much for right to repair…
The data breach
To add insult to injury, I also received the following email from Framework during my interaction with support:
From: Framework <support@frame.work>
Subject: Notice of Limited Data Breach
Date: 2026-08-06 23:04 EDTDear Valued Framework Customer,
We are writing to inform you of a data breach at our business intelligence database provider Metabase that resulted in an attacker accessing customer names, email addresses, phone numbers, and addresses. Your information was in the database that was accessed in this breach. This breach did not include order or payment information.
We have full details on the incident below. We are deeply sorry for this breach of information, and are reviewing and improving our methodology for data storage in external database vendors.
We are also in the process of notifying the regulatory authorities in each region where relevant regulations exist. Note that while regulations in most regions do not require notification for breaches of names, email addresses, phone numbers, and addresses, we are sending this email to you regardless to ensure you have visibility and can take any actions needed.
What happened?
On August 6th, 2026 at 9am Pacific Time, Metabase notified us of a breach of their systems with the following email message:
On Monday, August 3, we discovered that Metabase Cloud was attacked by someone utilizing an unknown (“0-day”) security vulnerability in versions 1.58 and above. We immediately blocked the endpoints used for the attack, then quickly identified and patched the vulnerability. We notified law enforcement, and we have engaged with a third party forensics firm to conduct an independent investigation.
Your instance of Metabase was vulnerable to this 0-day. Therefore, to protect your company, we recommend you:
- Rotate the credentials for every database connected to your instance; and
- Review the admin accounts on your instance and remove anything you don’t recognize.
We also discovered that the attacker was able to gain access to your instance. We created a report on the actions we believe the attacker took on your instance, which includes log files, and which you can get from the Metabase Store at [removed url].
(If you do not have access to the Metabase Store, are having issues accessing the report, or do not want to click on a link in an unexpected email, you can log into your instance directly and reach us at Help > Get help in the grid menu in the upper right hand corner. We’ll confirm this message is from us and email you the report.)
This report is based on our own application logs. We did not query or read the data in your connected databases.
Depending on the jurisdictions in which you operate and kinds of data your instance connects to, you may have notification obligations under applicable laws. If you have concerns in this regard, we recommend you assess potential notification obligations with your company’s legal or compliance experts.
We regret any inconvenience this incident may cause you, and we are here to support you. If you have questions, please reply to this email or email us at [removed email address], and we’ll get back to you as quickly as we can.
Sameer Al-Sakran
Founder and CEO
MetabaseWe immediately investigated the logs Metabase provided to us and confirmed that our database instance was accessed by the attacker. We confirmed that the following information was accessed:
- Full name
- Email address
- Login IPs
- Billing and shipping address information
- Country
- Address
- City
- State
- Zip code
- Phone number
- Company
For Framework for Business customers, we are investigating whether the following information may additionally have been accessed:
- Company
- Phone
- VAT
- EIN
- Billing Email
No other personally identifiable information, order information, or payment information was accessed.
Note that Metabase has additionally flagged:
Important: This is a preliminary update based on our current knowledge.
We are working with a third-party forensic investigation firm to understand the full nature and scope of the event.
We are providing you this interim update in advance of completing our investigation to allow you to better understand any potential impact and secure your data.
Our investigation is ongoing and the information shared now is preliminary.
Please look at the application logs as well as the queries executed that are provided as separate files in the zip file for detailed activity and a potential timeline.
We’re providing you notice of the breach in the meantime to ensure you have the earliest possible visibility. In the event Metabase notifies us of additional information that impacts you, we will send a follow-up email.
What was done to resolve the issue?
After we were notified of the breach by Metabase, we rotated credentials on all databases associated with our Metabase instance and confirmed that there were no changes in admin access or access to systems outside of Metabase.
What steps have you taken to ensure this doesn’t happen in the future?
We are evaluating the breadth and depth of data shared with business intelligence platforms, and scoping down their access to only the columns required for analysis.
Nirav Patel and the Framework Team
Well, I guess Framework at least disclosed this security incident instead of covering it up, which is a good thing? But then again, the regulators will be very upset if they found out it happened and wasn’t disclosed…
Still, I was very disappointed that Framework chose to entrust sensitive information to a third-party who obviously couldn’t keep the data safe. To have it happen at the same time as my expensive laptop getting bricked is just rubbing salt in the wound. Words cannot describe how disappointed I am at Framework right now.
As a sidenote, Framework stated that payment information wasn’t breached. Most people might breathe a sigh of relief, but that shouldn’t be the case. Since I paid with a credit card, even if Framework leaked my full credit card number11, my liability for any fraudulent transactions that happened as a result of this breach would be zero. All I’d need to do was call the credit card company, and they’d give me a new card. The rather more annoying things that they breached that I couldn’t easily change are phone numbers and addresses, unless I feel like moving… To Framework’s credit, they stated it as a matter of fact and didn’t try to dress the payment information not being leaked as a saving grace, as certain dishonest companies would.
Extracting the BIOS image
Anyways, now that we have the tools to flash the BIOS, and Framework is not even willing to supply the raw BIOS image, we have to determine what to flash to resurrect the BIOS.
From the BIOS flashing thread, user @David_Henry determined,
from reading the BIOS and experimenting with the flashing, that the raw BIOS
image is exactly 32 MiB starting from offset 1993293 in the .cap file
in Framework’s UEFI shell update package, and this is identical to the output
created by a third-party tool called InsydeH2O-extractor-2 on GitHub.
Since a hardcoded offset is unlikely to work for future versions, I would
recommend using the extractor tool. Unfortunately, the tool was written for
Microsoft’s C library and uses non-standard functions like fopen_s, which made
it not run on Linux. To deal with this, I forked the tool and
made it compile on Linux.
You can build it and extract the .cap file thus:
git clone https://github.com/quantum5/InsydeH2O-extractor-2.git
cd InsydeH2O-extractor-2
cmake .
make
./extractor /path/to/bios.cap
In the directory, you will find BIOSFILE.FD, and that is the file to flash.
For the Framework 13” AMD Ryzen 7040 series BIOS version 3.20, I have the image prepared already: https://dl.quantum2.xyz/firmware/framework-3.20-bios.bin
The hashes for that file are:
- MD5:
8bc4cde1b7e8413b9b405b8e7b243e1f - SHA1:
b562976496 f3baf ba5e0 7f2d9 6b038 04a70 8f90d - SHA256:
a645413ee1 9c7cf 28791 7a717 09988 3ea37 ed6b5 56c74 cf31a dbc5b 1afcc 9c05
Feel free to use my image after verifying its integrity. At the time of writing, at least four users have downloaded the full BIOS image from my server, presumably because they also had their laptops bricked and didn’t write about it on the Framework forums.
Delivery of the tools
Eight days after placing the order on AliExpress, the parts finally arrived. I started by inspecting my AliExpress flash programmers, as you’ve already seen. The CH341A had the voltage bug on top of being slow, so I decided that I would only try it as a last resort after fixing the voltage bug. Instead, the CH347 seemed promising.
I plugged the 1.8 V level shifter into my CH347 and verified that the data pins were outputting the expected 1.8 V, just in case. I also checked the pogo pin probe with my multimeter for continuity, confirming every pogo pin is connected to the correctly numbered pins on the header. While these precautions may seem extreme, you never know with the stuff you get on AliExpress.
In any case, I was happy with my tools, so I decided to continue.
Connecting the chip
Now, I just need to connect everything together so that my PC can talk to the BIOS chip through the CH347 flash programmer.
Since I am programming from a desktop PC, I opted to get a USB Type-A extension cable (i.e. a male-to-female cable), so that the CH347 flash programmer isn’t locked to a USB port.
Now, we need to understand the CH347’s pins. After some research, it’s clear that the pin order for type 25 SPI NOR flash is always the same, including our W25Q256JW, and that’s what the left side of the CH347 is designed to accept:
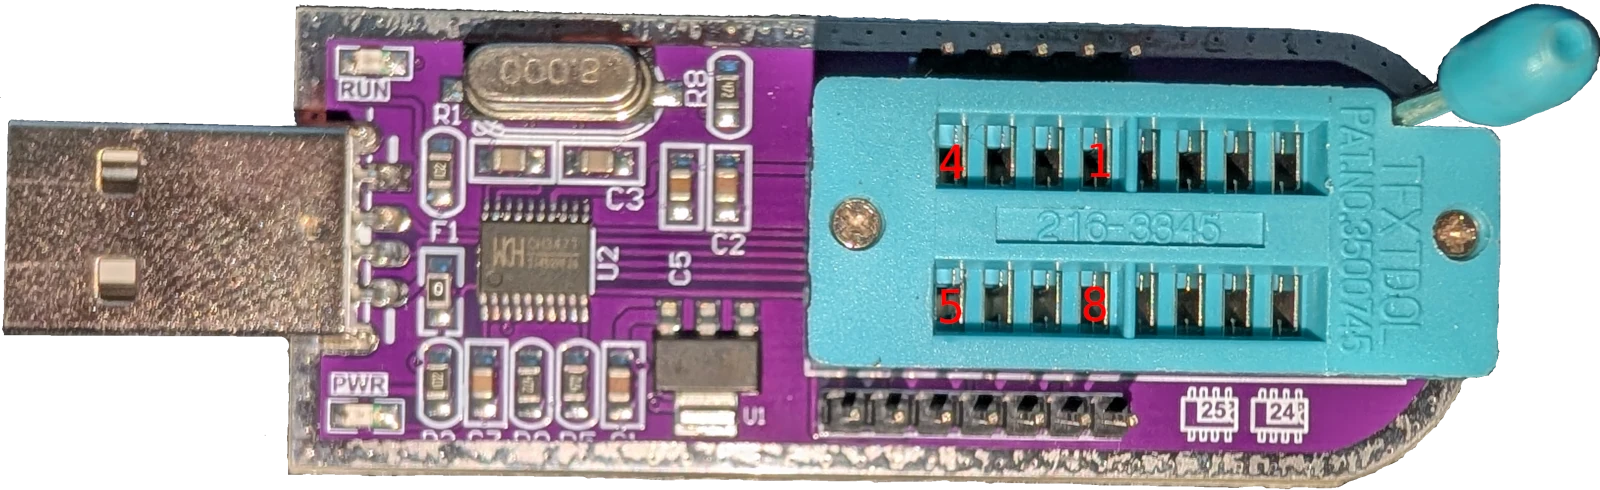
A diagram of where each SPI NOR flash pin should go on the CH347 programmer
If you look carefully at the bottom-right corner, you’ll see that there is a diagram of two chips, one labelled 25 and the other 24, that describes this pinout. What it means is that type 25 chips go on the left, and pin 1 is on the right side, as shown by the semicircle on the right. Type 24 chips, i.e. I²C serial EEPROMs, go on the right side, but we don’t need that for this project.
But what is that socket? That is a zero insertion force (ZIF) socket designed to accept a pin header. Once the pins are inserted, the lever can be pulled to the horizontal position to lock the pins in place. The mechanism is very similar to that of PGA CPU sockets, e.g. AM4.
While certain chips with pins can fit directly into the programmer, that is not the case for us. In any case, we have a 3.3 V programmer and a 1.8 V chip, so we need to insert that level shifter into the CH347 instead:
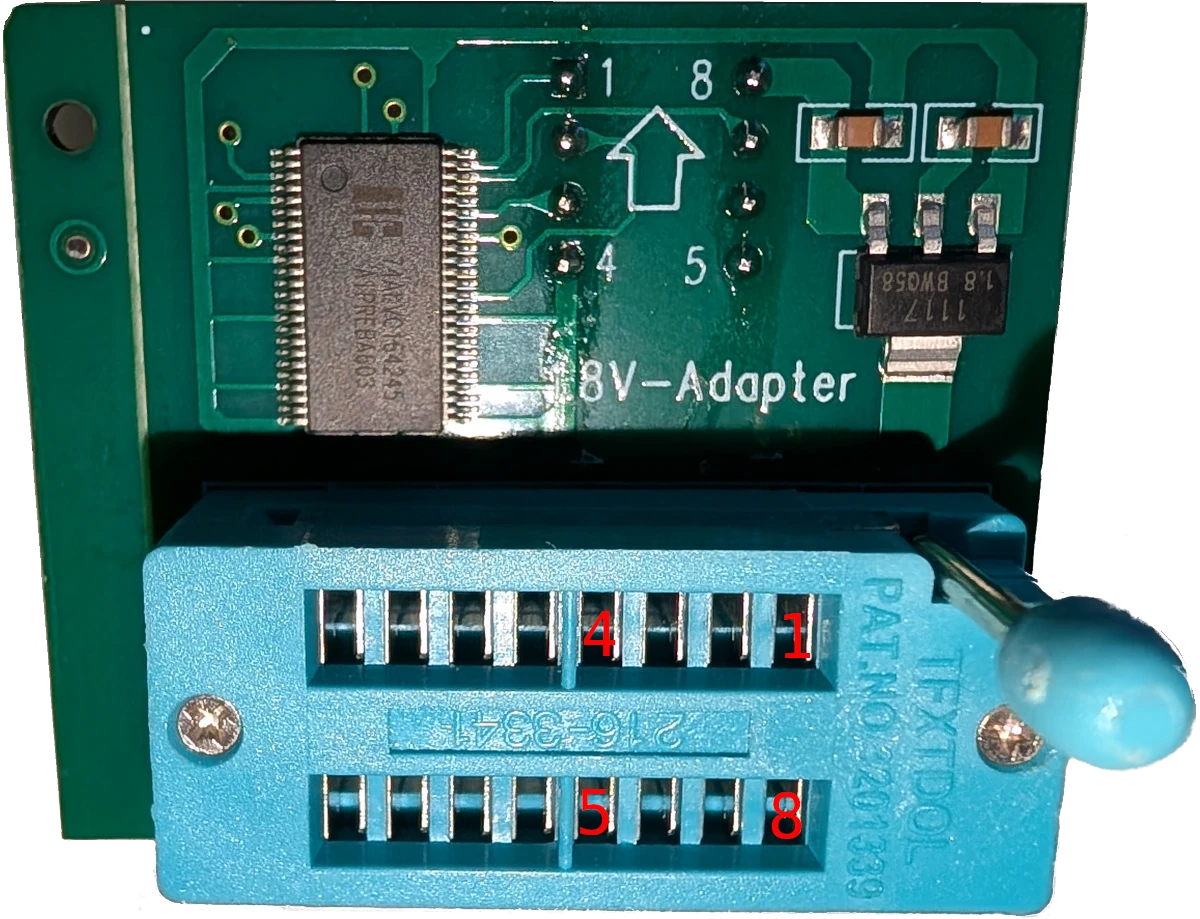
A diagram of where each SPI NOR flash pin should go on the 1.8 V level shifter
The level shifter has a header with labelled pins on the top, with the pins underneath. Those need to be inserted into the corresponding holes in the ZIF socket on the CH347, as described above.
The shifter provides another ZIF socket with 1.8 V. This time, only the right side of the socket is used, and pin 1 faces right. If you look at the shifter carefully, the pins are actually labelled right next to the ZIF socket on the PCB, but it’s hard to see in the picture, so I labelled them directly.
The next step is plugging in the pogo pin probe. It looks like this:
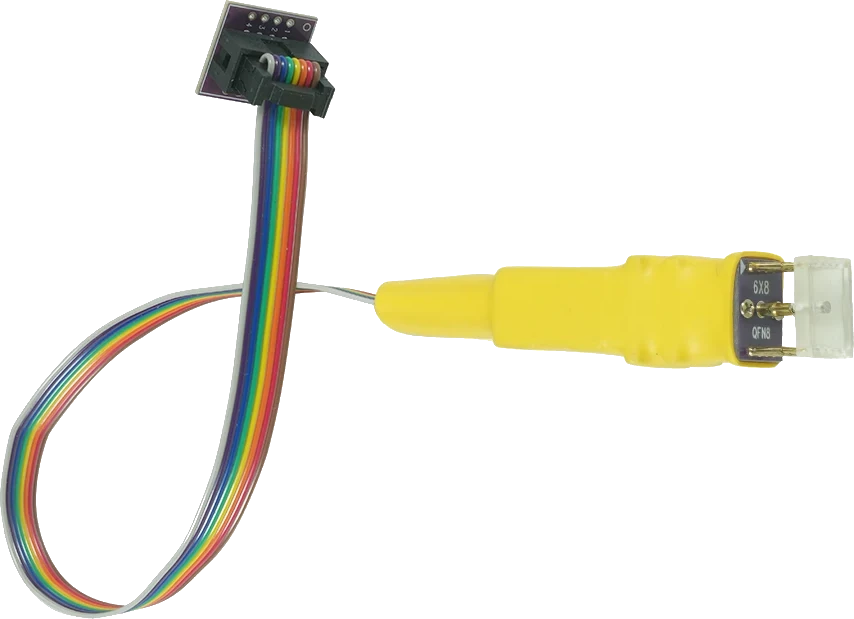
A picture of the WSON8 6×8mm pogo pin probe
The ribbon cable needs to be connected to the PCB with a pin header on the other side. The pins are numbered on the side with the ribbon cables. The header needs to be plugged into the ZIF socket on the level shifter, and the ZIF socket locked.
Now, you are ready to connect the probe to the BIOS chip. Before doing that, first open up the Framework laptop, disconnect the battery, and remove the expensive RAM and SSD from the motherboard, just in case you mess up and accidentally fry them. On that note, double check all the connections to make sure the pin order is correct everywhere. One mistake and the chip could be fried, or worse, the whole motherboard.
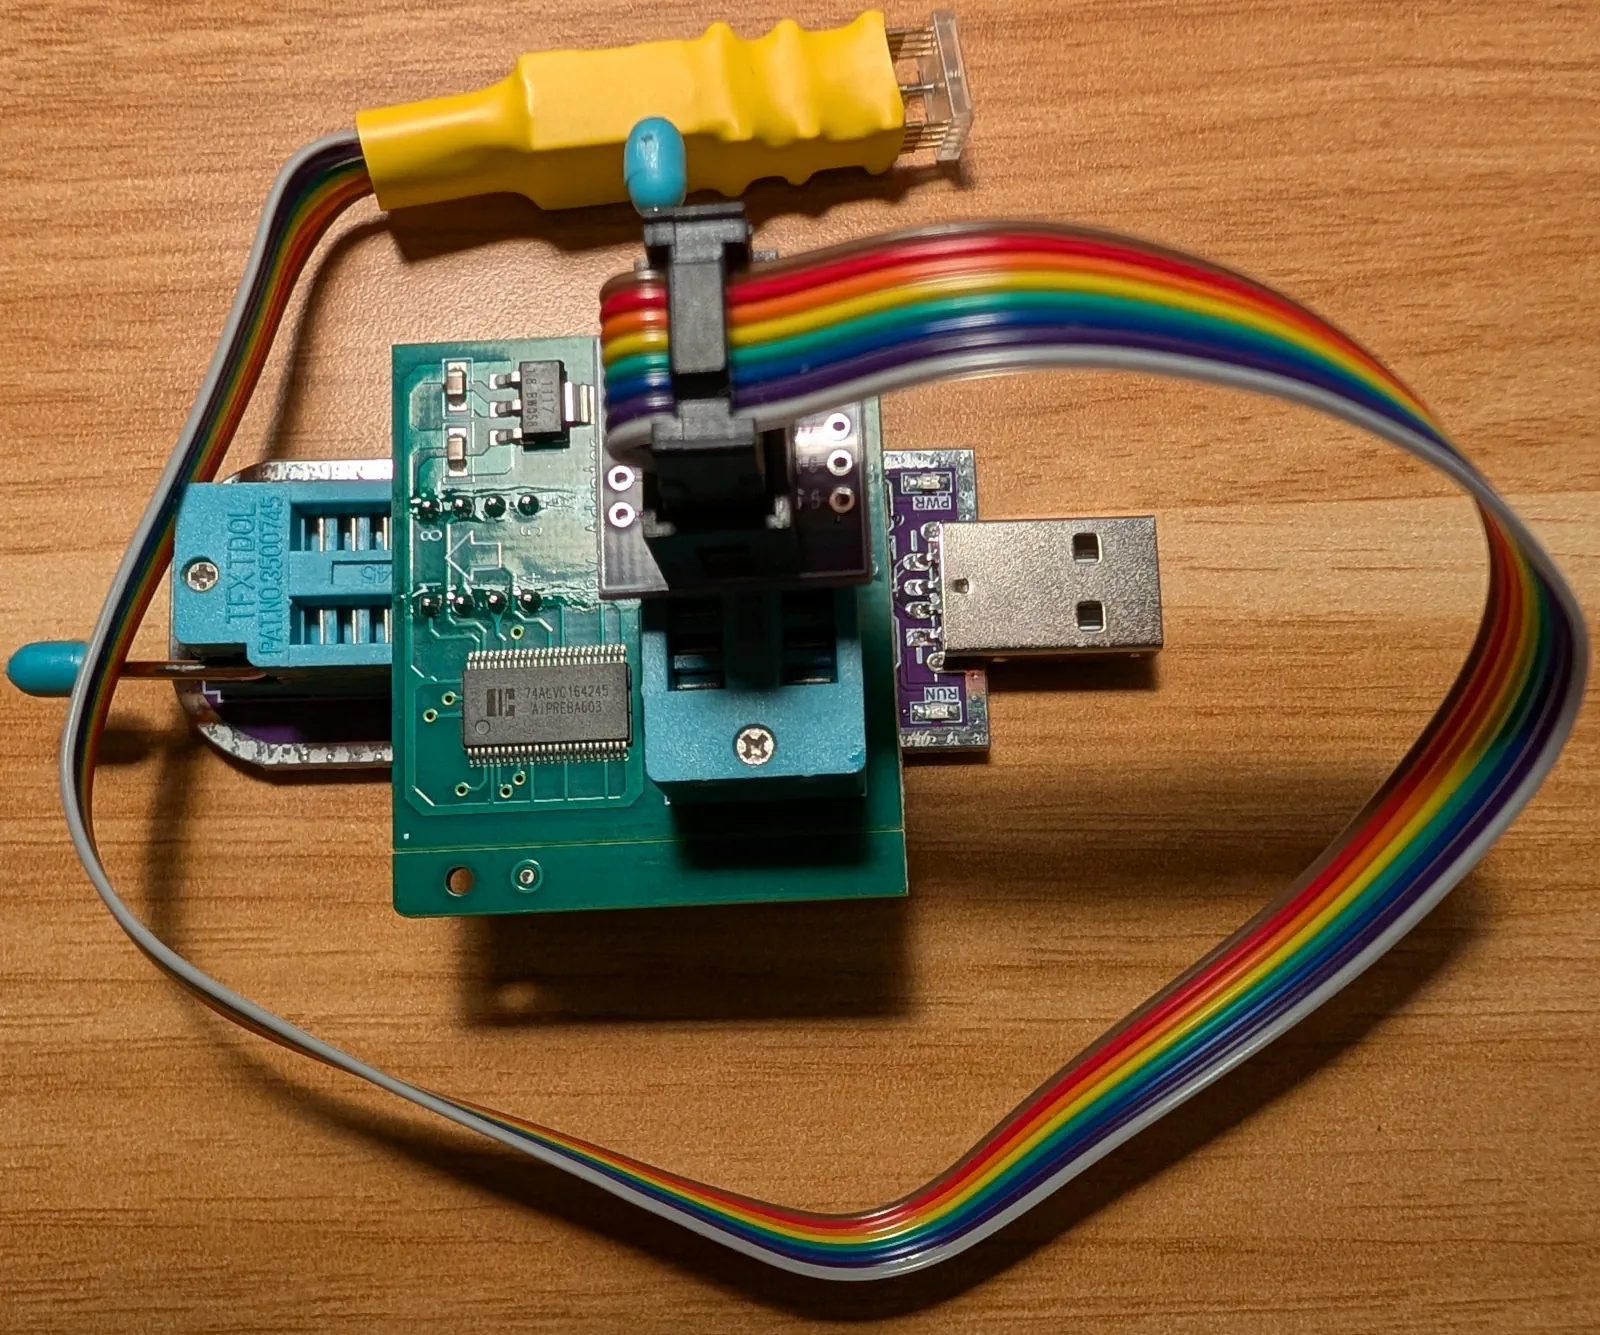
The full assembly with the CH347, the level shifter, and the pogo pin probe should look like this
Now, identify the side of the plastic on the pogo pin probe with an opaque semicircle. That’s the side with pin 1, and you need to make sure that side is positioned on the same side as the white dot on the chip. That’s the correct pin order. When flashing, place the probe on the chip and apply force to hold it down:
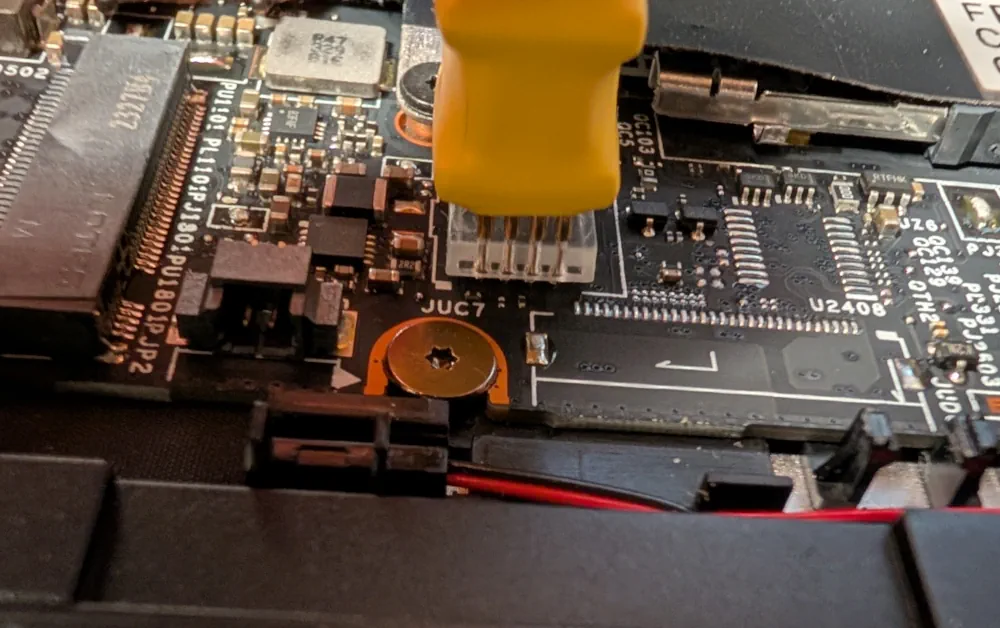
The pogo pin probe as used on the BIOS chip
Executing the flash
We will perform the flashing with the flashrom tool from the
coreboot project. Note that unlike on Windows, where drivers for these
programmers are necessary, flashrom is able to talk to all supported USB flash
programmers with libusb.
Double check that your flash programmer is supported by the version of
flashrom on your system:
$ sudo flashrom -L
...
Supported USB devices for the ch341a_spi programmer:
Vendor            Device   USB IDs    Status
Winchiphead (WCH) CH341A   1a86:5512  OK

Supported USB devices for the ch347_spi programmer:
Vendor              Device               USB IDs    Status
QinHeng Electronics USB To UART+SPI+I2C  1a86:55db  OK
QinHeng Electronics USB To UART+SPI+I2C  1a86:55de  OK
...
We see that both the CH341A and the CH347 are supported. If it’s not on your
system, you probably need a newer version of flashrom.
Also note that you will need to use one hand to hold down the pogo pins, and with the CH347’s relatively fast flashing, that’s probably the better strategy than trying to use some heavy object to apply the necessary force. Therefore, you are highly encouraged to use primary selection on Linux to copy commands presented here by selecting the text (try triple-clicking), then pasting it with middle click, which is a lot easier with one hand.
On a similar note, prepare the BIOS file as wanted.bin while you are at it.
Then, hash it:
$ sha256sum wanted.bin
a645413ee19c7cf287917a717099883ea37ed6b556c74cf31adbc5b1afcc9c05  wanted.bin
Now, push the pogo pin probe (remember the orientation!) onto the chip and check if it’s detected:
$ sudo flashrom --programmer ch347_spi
flashrom 1.4.0 on Linux 6.12.101+deb13-amd64 (x86_64)
flashrom is free software, get the source code at https://flashrom.org

Found Winbond flash chip "W25Q256JW" (32768 kB, SPI) on ch347_spi.
...
Good, it is. If it’s not, make sure the probe is positioned correctly and apply more force as needed. Quite a bit of force is required for a good connection. I would suggest applying progressively more force if you aren’t making good contact.
Now read the current contents of the BIOS chip. Since the connection is somewhat sketchy, it’s quite possible that you’ll end up with read errors, so you are encouraged to read multiple times until you get the same hash on at least two reads, ideally in a row:
sudo flashrom --programmer ch347_spi -r read-v1.bin --progress && sha256sum read-v1.bin
sudo flashrom --programmer ch347_spi -r read-v2.bin --progress && sha256sum read-v2.bin
sudo flashrom --programmer ch347_spi -r read-v3.bin --progress && sha256sum read-v3.bin
sudo flashrom --programmer ch347_spi -r read-v4.bin --progress && sha256sum read-v4.bin
sudo flashrom --programmer ch347_spi -r read-v5.bin --progress && sha256sum read-v5.bin
sudo flashrom --programmer ch347_spi -r read-v6.bin --progress && sha256sum read-v6.bin
In my case, I got the same hash on attempts 1, 4, and 5, after which I stopped. I kept holding the probe in the exact same position, since it was making good contact and would ensure the highest chance of success for subsequent steps.
If none of your attempts resulted in the same hash, you need to apply more force on the probe and try again. Also, while I didn’t time the attempts, I estimate that each read attempt took less than 20 seconds with the CH347.
It is very important to have a good copy of what’s currently on the BIOS chip, because it may contain information that could be useful later. You will soon find out what other information is stored in the BIOS chip that you might want to recover down the line. Keep the successfully read BIOS file safe.
Now, it’s time to write to the chip. I turned off verification with -nN due to
the jankiness of the connection, so I could verify later at my leisure instead
of holding down the probe for the duration of write and verify:
$ sudo flashrom --programmer ch347_spi -nNw wanted.bin --progress
flashrom 1.4.0 on Linux 6.12.101+deb13-amd64 (x86_64)
flashrom is free software, get the source code at https://flashrom.org

Found Winbond flash chip "W25Q256JW" (32768 kB, SPI) on ch347_spi.
===
Reading old flash chip contents... [READ] 1% complete... [snip]
[READ] 100% complete... [READ] 50% complete... [READ] 0% complete... [READ] 100% complete... done.
[READ] 0% complete... Erase/write done from 0 to 1ffffff
At this point, the flash is complete. For me, this flash operation took less than a minute. The CH347 was definitely worth it compared to the CH341A. Given how quickly the BIOS flashed externally over such a janky connection with a programmer that supports 11% of the maximum SPI clock the chip could do, I couldn’t help but wonder what Framework’s BIOS updater is doing that makes updating the BIOS take many minutes normally…
Now, do the manual verification by doing the same thing as reading, but to different files:
sudo flashrom --programmer ch347_spi -r verify-v1.bin --progress && sha256sum verify-v1.bin
sudo flashrom --programmer ch347_spi -r verify-v2.bin --progress && sha256sum verify-v2.bin
sudo flashrom --programmer ch347_spi -r verify-v3.bin --progress && sha256sum verify-v3.bin
Stop when you get the same hash as wanted.bin from earlier. I managed to pass
the verification on the first try. If you can’t get it after three attempts,
attempt the write again until it verifies.
Consequences of flashing
With the flash complete, I put the RAM and SSD back in and powered on my Framework laptop. After a minute of initial memory training (or something like that), it finally booted. However, the saga isn’t quite over.
I went into the BIOS setup to discover that all my customizations are gone. If you made any customizations, you would have to redo them. I also noticed this in the BIOS setup:
System UUID       1234567890
System SN         1234567890
I am pretty sure this wasn’t the case originally. It appears that this information is stored in the BIOS chip. There seems to be no ill effects to leaving it like this, at least on Linux, but it is quite possible that you need to activate Windows again.12
The correct values should in theory be preserved in the original BIOS image. If I knew the offsets, I could copy over the information into the new BIOS image and attempt another flash, but unfortunately, Framework has no documentation on the BIOS layout. Another repairability issue. Still, this is why you should keep the damaged BIOS image around.
After configuring the BIOS, I rebooted the system and discovered that it couldn’t find the bootloader for Debian. This information is stored on the UEFI NVRAM, and clearly, that has been erased somehow during this ordeal.
Fortunately, there was a “boot from file” option, and I searched my SSD for
EFI/debian/shimx64.efi and selected it, after which the GRUB menu showed up.
You may need to adjust the path based on your distro, and select grubx64.efi
if you don’t have secure boot.
The system booted normally after that, but I needed to reinstall the bootloader
to avoid having to manually select the file every boot. On most distros, this
can be done by running sudo grub-install /dev/nvme0n1p1, replacing
/dev/nvme0n1p1 with your EFI system partition.13
Conclusion
If you find yourself in the same situation as me with a dead Framework laptop due to BIOS issues and no flashing tools, then getting the CH347 programmer is the way to go. It’s way better than the old CH341A in every way, and clearly, it was able to get the job done quickly. The actual flashing wasn’t that difficult once I knew what I was doing and acquired the tools, taking less than five minutes total.
As for Framework Computer Inc, I have a lot more to say…
First, it is clear that Framework’s BIOS updater is broken, at least on the AMD 7040 series. There clearly is some bug with the software that caused it to display what appears to be random memory on the screen, especially when this has happened before to other people for other BIOS versions, and even on the 16” laptops. At the same time, it somehow flashes the BIOS slower in regular operation than a cheap 15 MHz programmer over pogo pins, which really makes you wonder what it’s doing under the hood.
Secondly, Framework encourages users to perform BIOS updates in their newsletters, and yet if the update results in bricking, Framework has nothing to say except that I should throw away perfectly good hardware due to a firmware issue, simply because it’s out of warranty. While this behaviour may be legal per the warranty terms, it nevertheless is morally the wrong way to treat users. It also goes against the whole philosophy of reducing e-waste that Framework claims to believe deeply.
Thirdly, Framework claims to have made a repairable laptop, and I think my experience and the hoops I had to jump through to flash the BIOS have decidedly shown this not to be the case. Framework has undoubtedly created an easily serviceable laptop on which it is trivial to replace the RAM and SSD, but it is not a repairable laptop when the manufacturer simply told me to buy a new motherboard and CPU while offering zero assistance in the way of fixing it myself.
According to the Repair Association, an organization championing the right to repair, a key pillar of the right to repair is documentation:
Provide the same repair manuals, schematic diagrams, and other documentation to facilitate complete repairs.
In this regard, Framework has utterly failed. I had to figure out the entire flashing process myself from third-party resources. I even had to extract the raw flashable BIOS image myself.
Furthermore, from attempting this repair, I can see that Framework made many design decisions that made the repair much harder than it needs to be:
- Framework had no BIOS recovery option;
- While the Framework motherboard has silkscreen markings for a socketed BIOS chip, a BIOS chip was soldered instead;
- Framework chose to use a WSON form factor for their BIOS chip; and
- Framework chose to not provide a header for flashing the BIOS, which, when combined with issue #3, forced the use of pogo pins.
I think it’s especially egregious when you consider that brands that specifically aren’t repairable are able to recover from a bad BIOS flash, and that even my 2004 vintage motherboard could do so…
So really, while Framework claims to support the right to repair, their actions have shown quite the opposite. As such, I cannot in good conscience recommend Framework laptops to anyone in their current state.
Finally, it is not clear why Framework needs a “business intelligence” provider in the first place, let alone one that stores customer data in an insecure fashion. It is also not clear why this provider needed information like my phone number or street address. In the communication I’ve received, Framework did not explain why this information was shared or what they were doing with this data, nor has Framework provided any update on their investigation at the time of writing over a week later.
As the owner of a Framework laptop who wants to benefit from the upgradability down the line, I would like to see Framework clean up their act and deliver on the promise they made when they sold the product. As such, I call upon Framework to:
- Immediately stop encouraging any users out of warranty to update their BIOS until the updater is fixed;
- Fix the BIOS updater as soon as possible;
- Provide immediate relief to any out-of-warranty customers whose laptop was bricked through a BIOS update, either through motherboard replacement like warrantied customers, or the free delivery of a toolkit and detailed guidance to perform the repair;
- Provide official documentation for BIOS flashing, raw BIOS images, and instructions to restore the serial numbers and UUIDs;
- Design all future motherboards to be easily recoverable from bad BIOS flashes; and
- Immediately cease any unnecessary data sharing with third parties.
If Framework changes for the better, I might consider them again. Until then, I shall repeat the words that a certain Nanni wrote to Ea-nāṣir close to four millennia ago:
Kīma annikīam maḫšabam la dummuqām la amaḫḫaruka talammad. U ana ša tumeišanni nasiḫtam epūška.14
The translation depends on whom you ask, but it probably means something like:
Take cognizance that I will not accept any computer from you that is not of fine quality. And because you have treated me with contempt, I shall exercise against you my right of rejection.
Updates
When I originally wrote this post, I expected it to be simply a guide of sufficient detail as to help any affected users, since Framework refused to offer any repairs out-of-warranty. However, things have since gone way beyond my expectations:
-
On 2026-08-18, a reader submitted this post to Hacker News. It made its way to the front page that same day and received 425 upvotes and 305 comments as of 2026-08-22.
- HN user amstan pointed out that Framework has an SPI flash header on the board. Unfortunately, as the same commenter noted, the header wasn’t populated for cost reasons. On DigiKey, as linked in the header documentation, the connector costs less than $1 to populate at large batch sizes, and probably much less if ordered on Framework’s scale. Populating this header myself would have required some soldering that’s more difficult and risky than the pogo pins approach.
-
On the same day, a reader also submitted this post to Lobsters and it also made its way to the front page there. It was also posted to Tildes.
-
On 2026-08-19, Ars Technica reported on this issue, linking and quoting this post. I guess I can now say that I have been quoted in the news. Framework made a statement to Ars saying that they will replace boards out-of-warranty, as well as introduce a “Crisis Recovery Mode” to recover from BIOS flash failures, which already existed in their desktop offerings, to laptops in a BIOS update.
I am happy that Framework finally acknowledged the issue and took their first step to fix it, but disappointed that it took massive public outcry through Hacker News and the media for them to finally pay attention, given the longevity of the issue on their forums. I am also concerned that this response will not stop instances of bricking from happening in the first place, which is still a scary experience for users, even if they do get a free replacement or can use the “Crisis Recovery Mode” to recover.
Either way, words are cheap. Only time will tell if Framework follows through with action. I will be watching.
-
On 2026-08-20, The Verge also reported on this issue, with Framework giving what appears to be the same statement they had given to Ars Technica.
-
On the same day, Framework also reached out to me with what seems to be a generic template:
We appreciate your feedback and I have forwarded it to our teams so we can look into it further. This case was escalated for review. After carefully reviewing the provided information, we’ve come to the conclusion that there is a need for a replacement Mainboard [sic, no period]
Can you confirm if the shipping address on your account is still up to date? You can log into your Framework Account and change your default Saved Address.
You can also fill in your shipping information below:
Updated Shipping Address:
Name:
Street address:
City:
State:
Zip Code:
Country:
Phone number:We will use this information to provide you with shipping and return labels.
We look forward to your response.
Regards,
Framework SupportIt is not clear to me what feedback Framework is talking about, as I have not replied to the support thread after being told to buy a new motherboard. It appears that Framework is going through past support cases to identify affected users and offer replacements, which is confirmed by YouTuber and Framework investor Linus Sebastian on the 2026-08-21 WAN Show when discussing this issue. This is a move in the right direction.
I am curious what the remedy would be for users who have already bought a replacement motherboard, especially if the new board is an upgrade. If you are in this situation, feel free to let me know via comment or email.
I will also note that Framework still has a lot of work to do to be more friendly to their non-US customers. In Canada and many countries, there is no concept of “states” or “ZIP codes,” but rather provinces and postal codes. The standard pattern for this is to write “state/province/region” and “ZIP/postal code,” which is more suitable for international use.
I declined the replacement, as I had already fixed the board myself and didn’t want to wait however long it takes for the warranty replacement to arrive and deprive myself of a laptop in the meantime. I instead asked for documentation to fix the serial numbers, but have received no response so far.
Notes
-
While the Framework DIY edition was cheaper to purchase, it was not in fact very DIY. The laptop came mostly preassembled, and the only things I had to do were putting in the RAM and SSD, connecting the input cover, closing the laptop, and installing the bezels. I was expecting to install the motherboard at least, not finishing off an almost-assembled laptop. ↩
-
Back in 2023, I got close to a 50% discount buying them separately on Amazon instead of buying them bundled with the Framework laptop. Imagine that today… ↩
-
Yes, technically, this is a Unified Extensible Firmware Interface (UEFI) firmware, since no one uses legacy BIOS these days. Still, a lot of manufacturers refer to UEFI firmware as “BIOS” because it’s the familiar term. I am loosely using the term “BIOS” here since that’s what Framework chose to call it. ↩
-
I once owned a laptop with a Canadian Multilingual Standard keyboard, and it was just horrible to use, with extra keys for French cutting into the space you’d expect for the Enter key and the left Shift key. The actual layout, if you choose to use it in software, also uses AltGr15 and hijacks the right Ctrl as an additional modifier, despite not using the AltGr layer fully.
The real kicker is that the layout is super unintuitive for typing French, which is its entire raison d’être, compared to the AltGr and dead keys-based layout that I constructed myself. My own layout can type most European languages, even those using the Greek and Cyrillic alphabets, with ease. One day, I might write something about constructing my own keyboard layout, but today is not the day. ↩
-
I ultimately bought a Crucial 2×16 GiB DDR5 5600 MT/s kit for CA$154.80 after tax, a price that’s unimaginable today. Currently, that same kit is worth $854.18 before tax, though that might be because the Crucial brand is no more. Similar kits of SODIMMs from other brands at the same speed start at CA$570 before tax. ↩
-
I ultimately bought a 1 TB Samsung 980 Pro, which cost CA$90.37 after tax, a price that’s also unimaginable today. It’s no longer in stock, but the 990 Pro goes for $400 at the time of writing. ↩
-
I apologize for the low quality of this image, but I had bigger things to worry about than taking a good picture. ↩
-
I’ve also been doing more soldering for some smart home sensors I am working on, which I plan to write about later. ↩
-
Do you all still remember what a floppy disk is? Either way, talking about it dates how ancient motherboards with such recovery features are. ↩
-
There is a 1.8 V CH347 on AliExpress as well, but that one supposedly has a software toggle between 1.8 V and 3.3 V and just seemed complicated to use compared to the regular 3.3 V version with a level shifter. ↩
-
I would be impressed if Framework actually managed to leak the full credit card number. Most payment processors never reveal the full number to merchants using them, only the last four digits. ↩
-
I wouldn’t know. Windows has never been installed on bare metal on either my desktop or laptop. ↩
-
Technically, based on a reading of the
grub-installsource code on UEFI systems, you can pass any argument as long as you pass something, but let’s pass the ESP to be safe. ↩ -
My Akkadian is very bad, but this is based on the last lines on the cuneiform tablet containing the oldest known customer complaint, with the word for copper replaced by “computer.” Obviously, computers didn’t exist back then, so I constructed maḫšabam based on the Semitic root ḥ-s₁-b used in the Arabic word حاسوب and the Hebrew word מחשב. I used the Latin alphabet instead of cuneiform because Unicode doesn’t support most of the signs used on the actual tablet. ↩
-
The AltGr key is just the right Alt key, but mapped by a keyboard layout as its own modifier for typing additional characters on the keyboard, instead of being just another Alt key. ↩