Windows VM with GPU Passthrough, Part 2: Passing through PCIe Devices
Last time, we discussed how we might create a Windows virtual machine as part of a series on running a Windows VM with native-level graphics performance via GPU passthrough and integrating it seamlessly into your Linux desktop via Looking Glass. Today, we shall turn that normal Windows virtual machine into something far more interesting by giving it a real GPU.
As far as Windows is concerned, the GPU is real hardware and can be treated as
normal, so we will not go into too much depth. Most of the work lies on the
Linux side, where we must do some work to make sure the GPU is free for the VM
to use, and then instruct the hypervisor to use it. Again, we will be using the
standard QEMU/KVM setup, managing our virtual machines with libvirt.
Naturally, the same procedure here can be used for any other PCIe device, such as NVMe SSDs. Let’s begin!
Enabling IOMMU
To begin, we must first enable the feature known as IOMMU. This is essentially a translation layer for device-visible virtual addresses to real physical memory addresses. The IOMMU can be used to remap the addresses seen by PCIe devices to be the same as that of the virtual machine’s memory addresses, allowing it to function in a virtual machine as if it was directly plugged into it. This enables us to pass PCIe devices through to the virtual machine.
IOMMU is a hardware feature and requires support from both the CPU and the system firmware. If you have anything remotely recent, like AMD Bulldozer or Ryzen CPUs and Intel Core i3/i5/i7 CPUs, you almost certainly have support.
This setting is controlled by the UEFI firmware (commonly still called “BIOS”). Usually, you want to go into the UEFI firmware settings and enable the feature. It may be listed under names like IOMMU, Intel VT-d, AMD-Vi, or any other such names. It’s often buried deep in some menus, so you have systematically search through all the menus. Unfortunately, like enabling hardware-assisted virtualization, this is highly dependent on the motherboard, and oftentimes, also undocumented. You are on your own here, but it should not be too hard.
Once the feature is enabled in the UEFI firmware, you’ll need to enable it via a
kernel command line flag. Typically, this is done by adding the flags to the
GRUB_CMDLINE_LINUX line in /etc/default/grub. For Intel CPUs, you want to
add intel_iommu=on, and for AMD CPUs, you want to add amd_iommu=on. You
often want to add iommu=pt as well to avoid issues with devices that you are
not passing through. Once done, the line should look something like (where ...
represents other flags, if you have them):
GRUB_CMDLINE_LINUX="... amd_iommu=on iommu=pt ..."
Once this is done, you’ll need to regenerate the grub configuration. On Debian
and derivatives, this would be sudo update-grub. On Arch, this would be sudo
grub-mkconfig -o /boot/grub/grub.cfg. If you are using any other distribution
or bootloader, follow its documentation.
Identifying the device
After enabling IOMMU, we must identify the PCIe device we want to pass to the virtual machine. We also need to check which IOMMU group it is in. To do this, you can use this script:
#!/bin/bash
echo 'PCIe devices'
shopt -s nullglob
for g in $(find /sys/kernel/iommu_groups/ -mindepth 1 -maxdepth 1 -type d | sort -V); do
    echo "IOMMU Group ${g##*/}:"
    for d in "$g/devices/"*; do
        echo -e "\t$(lspci -nns ${d##*/})"
    done
done

echo
echo 'USB Controllers'
for usb_ctrl in /sys/bus/pci/devices/*/usb*; do
    pci_path="${usb_ctrl%/*}"
    iommu_group="$(readlink $pci_path/iommu_group)"
    echo "Bus $(cat $usb_ctrl/busnum) --> ${pci_path##*/} (IOMMU group ${iommu_group##*/})"
    lsusb -s "${usb_ctrl#*/usb}:"
    echo
done
Save this as iommu.sh and execute it via bash iommu.sh. For example, this is
what my GTX 1060 show up as:
$ bash iommu.sh
...
IOMMU Group 29:
  0c:00.0 VGA compatible controller [0300]: NVIDIA Corporation GP106 [GeForce GTX 1060 6GB] [10de:1c03] (rev a1)
  0c:00.1 Audio device [0403]: NVIDIA Corporation GP106 High Definition Audio Controller [10de:10f1] (rev a1)
...
As you can see, the GPU and its corresponding audio device are the only devices listed in IOMMU group 29. This is the ideal scenario, and this GPU can be passed through without any issues. If you are passing through any other device, it should also be in its own IOMMU group. Sometimes, you’ll see a “PCI bridge” device in the IOMMU group. This is fine and you can also proceed.
If you see any other devices in the IOMMU group, you may need to go into your UEFI firmware settings and enable a feature called ACS. This may result in a better IOMMU group. If this is not possible or did not help, then you will need the ACS override patch. Using it degrades system security and is out-of-scope for this post, though instructions are readily available via Google. Once this patch is applied, all the devices will be broken up into their own IOMMU groups.
Once the device you wish to pass through is in its own IOMMU group, note down
their device IDs. In the case of my 1060, these are 10de:1c03 and 10de:10f1
as seen in the output above.
Note that you may have some trouble if you have multiple devices with the same
IDs, for example, if you have two GPUs of the same model. In such cases, you can
attempt to distinguish them by subsystem ID, which you may view via lspci -s
[PCIe address] -nnv, where the address is something like 0c:00.0 in the
example. If you can’t, then you are on your own. This section on the Arch
wiki may prove helpful, if you know how to adapt it to your distribution.
Isolating the device
To give any PCIe device, such as a second GPU, to a virtual machine, it must
first be unused by the host machine. Otherwise, sheer chaos ensues as two sets
of drivers attempt to control the same device. While libvirt has decent
support for unloading the host machine drivers before passing a device to the
virtual machine, this is has some quirks. For example, if the GPU is currently
being used (sometimes unwittingly), the process that’s using it must be stopped
before the virtual machine can start. This is not worth the trouble, so it’s
usually easier to mark the device for passthrough at boot time, preventing
anything else from using it.
To achieve this, we isolate the device at boot time by binding the device to
the vfio-pci kernel module. This is a four-step process:
- You need to use a kernel parameter to tell
vfio-pcito bind to your desired device. This is done via thevfio-pci.idsparameter, which takes a comma separated list of device IDs, each of which follows the formatvendor:device. For example, with my 1060 example, it would be[:subvendor[:subdevice [:class[:class_mask]]]] vfio-pci.ids=10de:1c03,10de:10f1. Follow the same instructions as above to add the parameter. -
You will then need to tell your initramfs tool to include the
vfio-pcimodule. On most distros usinginitramfs-tools, such as Debian and derivatives, you can add the following lines to/etc/initramfs-tools/modules:# VFIO vfio_pci vfio vfio_iommu_type1 vfio_virqfdIf you are using another initramfs tool, this section on the Arch wiki might prove helpful.
-
If you are using
initramfs-tools(and potentially others, I haven’t tested them), you will also need to declare a soft dependency for the usual kernel module for your device onvfio-pcito ensure thatvfio-pcibinds to the device first. For GPUs, adding the following lines to/etc/modprobe.d/vfio.conf(you may need to create this file) is sufficient:# Make vfio-pci a pre-dependency of the usual video modules softdep amdgpu pre: vfio-pci softdep radeon pre: vfio-pci softdep nouveau pre: vfio-pci softdep snd_intel_hda pre: vfio-pci - Finally, you will need to regenerate your initramfs. On Debian and
derivatives, this can be done via
sudo update-initramfs. For other initramfs tools, follow its documentation.
Adding the device to the virtual machine
At this point, all the hard work is out of the way. All you need to do now is to
start virt-manager and edit the virtual machine you created in part 1:
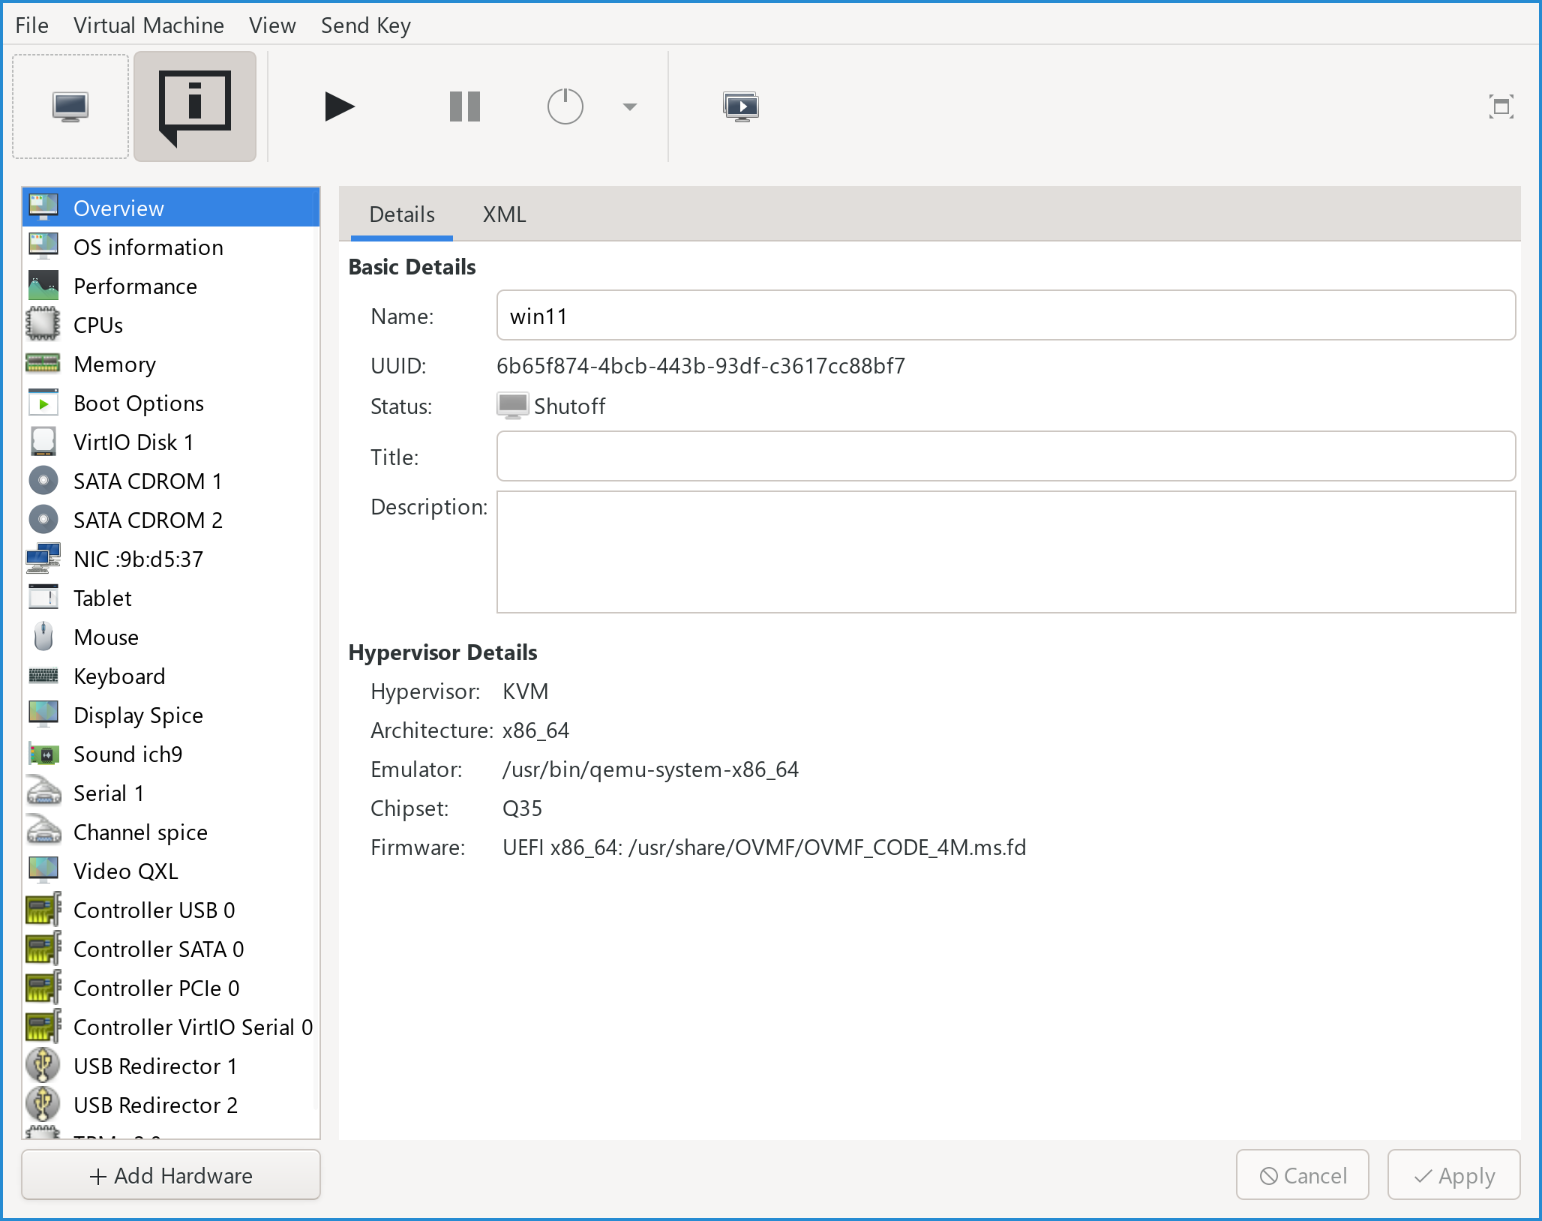
Click , then go to “PCI Host Device” and select the desired device. In our example, this is the 1060:
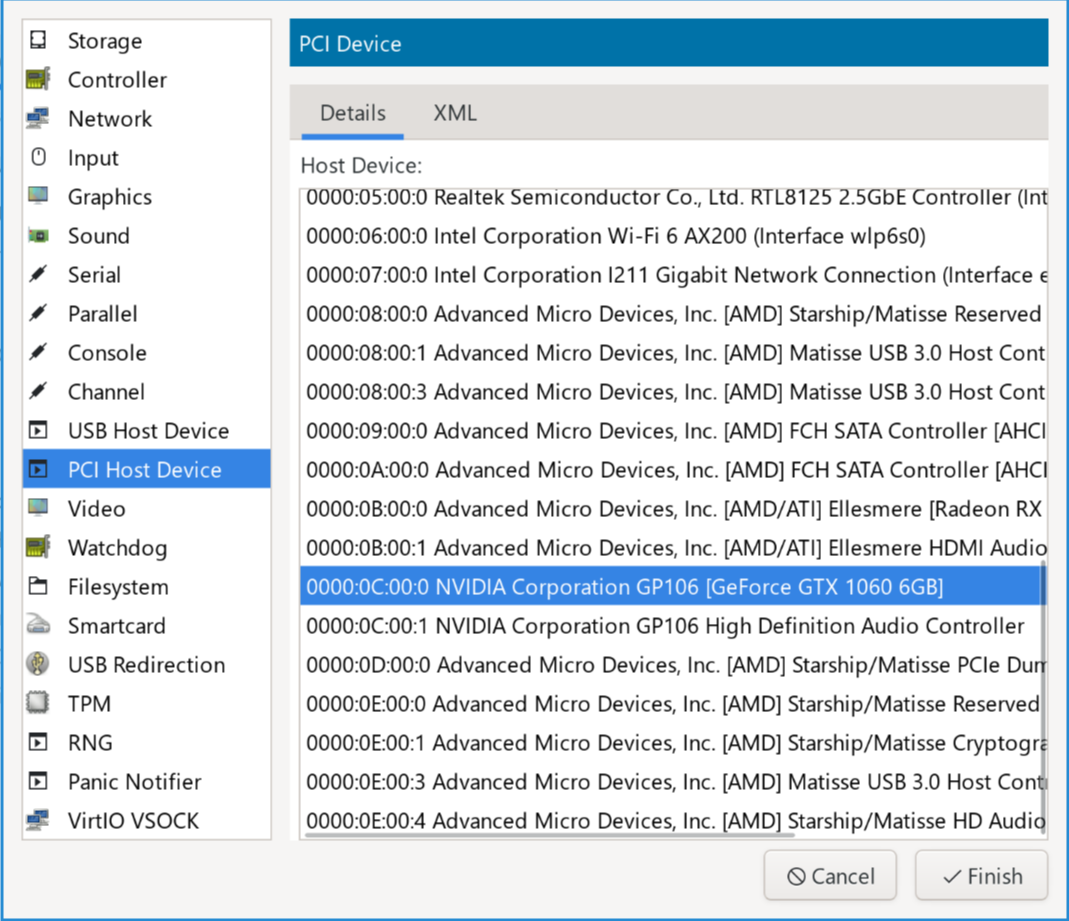
For GPUs, remember to repeat the process for its corresponding audio device.
Once you are done, you can start the virtual machine. The GPU should be detected as a new hardware device, just as if you had a Windows machine with a new GPU plugged in. At this point, you install drivers for it:
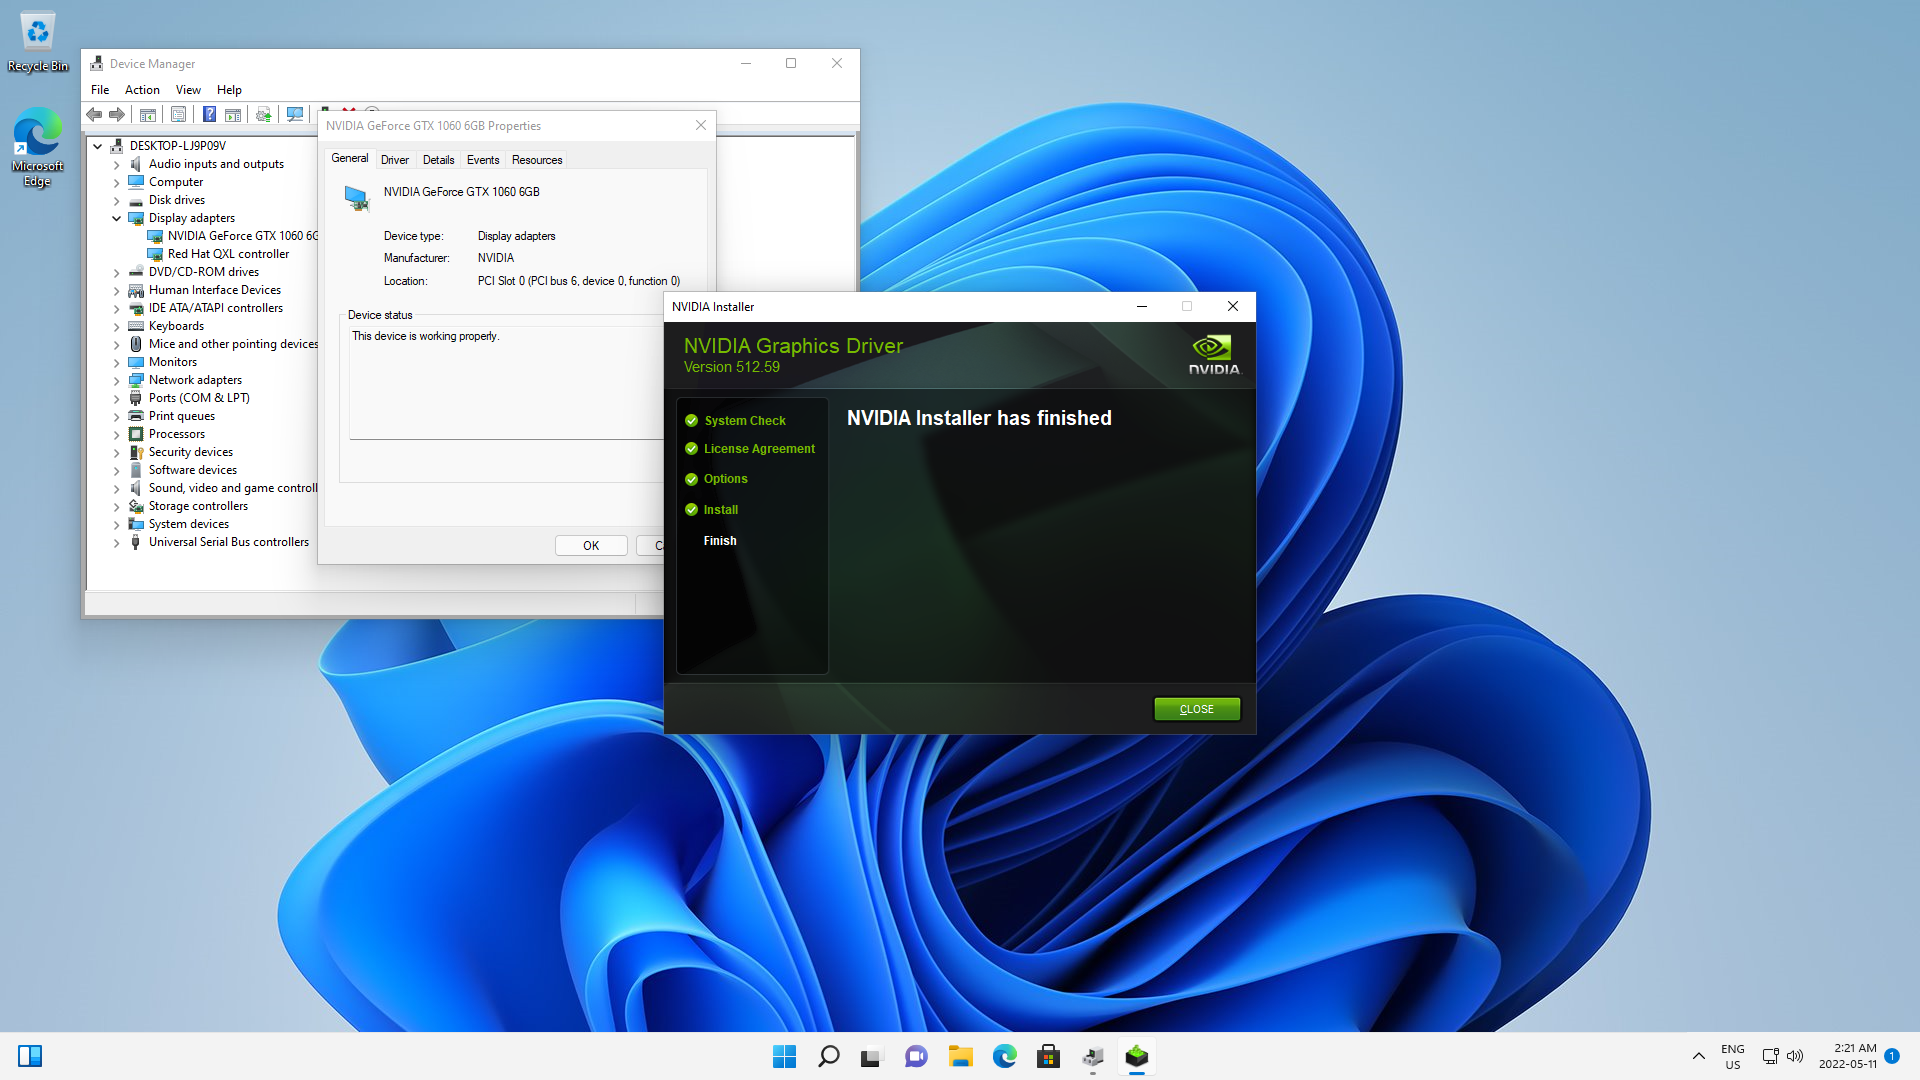
Once that is done, if you plug in a monitor, you should be able to use the Windows desktop on that monitor and play games with hardware acceleration.
Next time, we shall look into installing Looking Glass and integrate the virtual machine into the Linux desktop properly.