On reusing old cases for NAS applications
My home server—the one that acts as my router and NAS, while hosting a multitude
of services at home, such as mirror.quantum5.ca—had a problem: it was
using a nameless case that was at least 20 years old, and it wasn’t doing the
job well. The ancient case was from an era when computers were much smaller and
emitted a lot less heat. With a modern air cooler, I couldn’t even close the
side panel.
However, buying a modern case has significant drawbacks. The design philosophy for cases in the 2020s is completely focused on displaying all the internals with as much glass as possible, offering as much cooling as possible for power-hungry components, or both. Given that spinning hard drives (HDDs) have gone completely out of fashion in the PC market, drive bays are sacrificed to improve cooling and aesthetics. Whereas my 20+-year-old case had six 3.5” HDD bays and four more 5.25” bays for optical drives that could be repurposed to house more HDDs, most modern cases, if they still had 3.5” HDD bays, could host at most three. This was perfectly fine for building PCs, but it was far from ideal for building a NAS.
What I really wanted was a full ATX case with good cooling and as many drive bays as possible. There’s effectively only one case on the market that fulfilled these requirements—Fractal Design’s Meshify 2 or the XL variant—and they came at a price of ~$200 CAD and ~$270 CAD, respectively, which always felt a bit too expensive for this hobby. So instead, I kept using the crappy old case. That was until I found an old Antec 1200, which ticked all my requirements, for free.
This post documents my experience of repurposing the 17-year-old Antec 1200 to fit a modern computer acting as a NAS, and my thoughts on the endeavour after doing it.
How come these ancient cases work?
A common question might be: why do these old cases still fit modern components just fine?
This is because ever since the late 1990s, the vast majority of computer cases, motherboards, and power supplies have followed the ATX standard, which was introduced by Intel in 1995. Even 30 years later in 2025, the latest motherboard could still be installed into the earliest computer case, as long as they are both ATX1. For this reason, computer cases are one of the most reusable components in a computer—that is, if you are willing to deal with the quirks.
Despite ostensibly following the same ATX standard, computer cases have evolved significantly over the years, aesthetically from the beige boxes to the modern fad of using as much glass as possible, and functionally from sealed boxes to complete mesh fronts.
You’ll notice several things that have changed over the years:
- Front panel headers: Perhaps the most obvious difference is the kind of ports available on the front panel. The oldest cases may just have a power and reset button. Then, USB 2.0 and audio jacks started showing up, before getting replaced with USB 3.0 and USB-C ports;
- Cooling: Computers have grown a lot more power-hungry, and since all the power eventually gets emitted as heat, this has required beefier and beefier cooling. The old solution of basically sealed cases would quickly overheat and either damage hardware or cause it to thermal throttle to snail speed;
- Air intake: Older cases would have no fan slots or just one or two exhaust fans for cooling. While this got the job done by getting rid of the hot air, it comes at a cost—due to the negative pressure generated inside the case, air would be sucked in from every hole in the case, causing dust to accumulate everywhere inside. Modern cases typically have a bunch of filtered intakes with washable filters to suck up most of the dust and are configured with positive pressure, leaving the insides of the case a lot cleaner;
- PSU mounting: The traditional location of the power supply is above the motherboard. However, since heat rises, cases benefit from having the top open to let the heat flow out and having top exhaust fans to aid the process. Top-mounted PSUs came in the way of increasing cooling requirements, and almost all cases since the 2010s have the PSU at the bottom. The new way also allows large radiators to be mounted at the top, which is beneficial for GPU cooling, instead of just at the front;
- PSU air circulation: Older cases typically use the fan on the PSU as an additional fan to exhaust hot air from the case, while modern cases typically give the PSU fan a separate filtered intake at the bottom of the case to completely isolate it from the rest of the system. The new design also allowed the PSU to be housed in a “basement,” which covered up the cables coming out of the PSU for better aesthetics;
- Transparency: Ever since the rise of RGB, computer internals became fashionable to look at, which motivated transparent side panels to let the RGB shine through. Acrylic used to be a popular choice, but now basically all cases have tempered glass side panels; and
- Drive bays: After SSDs have become completely mainstream, HDD is basically completely obsolete except in NAS applications, resulting in a massive reduction of 3.5” bays for them. Similarly, with the death of optical media, there wasn’t much point in keeping the 5.25” bays for them either. A lot of modern cases have no way to mount optical drives and can mount only a very limited number of 3.5” HDDs.
What’s in the server?
As I’ve mentioned before on this blog, the hardware specs are as follows:
- CPU: AMD Ryzen 9 3900X
- CPU Cooler: Deepcool AK620
- Motherboard: ASUS Prime X570-P
- RAM: 4×Crucial 16 GB 2666 MT/s ECC (CT16G4WFD8266)
- GPU: ASUS Turbo GeForce GTX 1060 6 GB
- Storage:
- 2×WD Red Pro 16 TB NAS HDD (WD161KFGX) for the main storage array
- 2×Seagate IronWolf 4 TB NAS drive (ST4000VN008) for the experimental SSD-cached array2
Note that while I only have four drives at the moment, my storage is quite close to being full anyway and I will likely need to add more drives soon, so extensibility is quite important to me.
However, this time around, what’s more important is probably the dimensions of the components rather than the exact hardware:
- The length is constrained by the GPU, which is 267 mm long. Given current GPU trends, if I had to upgrade the GPU down the line, it is quite likely I might end up with something even longer. While the GPU technically fit inside the ancient case, it completely blocked off three drive bays from being used. In the Antec 1200, a drive could barely squeeze in next to the GPU with a right-angled SATA adapter, but the case could theoretically fit in a 330 mm GPU, at the cost of blocking the drive bay it’s next to;
- The width is constrained by the height CPU air cooler, since it’s mounted sideways. The AK620 is 160 mm tall. Since the ATX standard requires a motherboard I/O shield height of 44.45 mm, any case that places a 120 mm fan next to the I/O shield should fit the AK620. The nameless ancient case, on the other hand, only had a 90 mm fan slot next to the I/O shield slot, preventing the side panel from being closed; and
- The height of the case is constrained by the size of an ATX motherboard, though cases are broadly available in two sizes that fit an ATX motherboard, commonly called ATX mid-towers and full towers. A mid-tower basically barely fits an ATX motherboard, whereas a full tower has a lot more space, enabling it to fit more drives, for example.
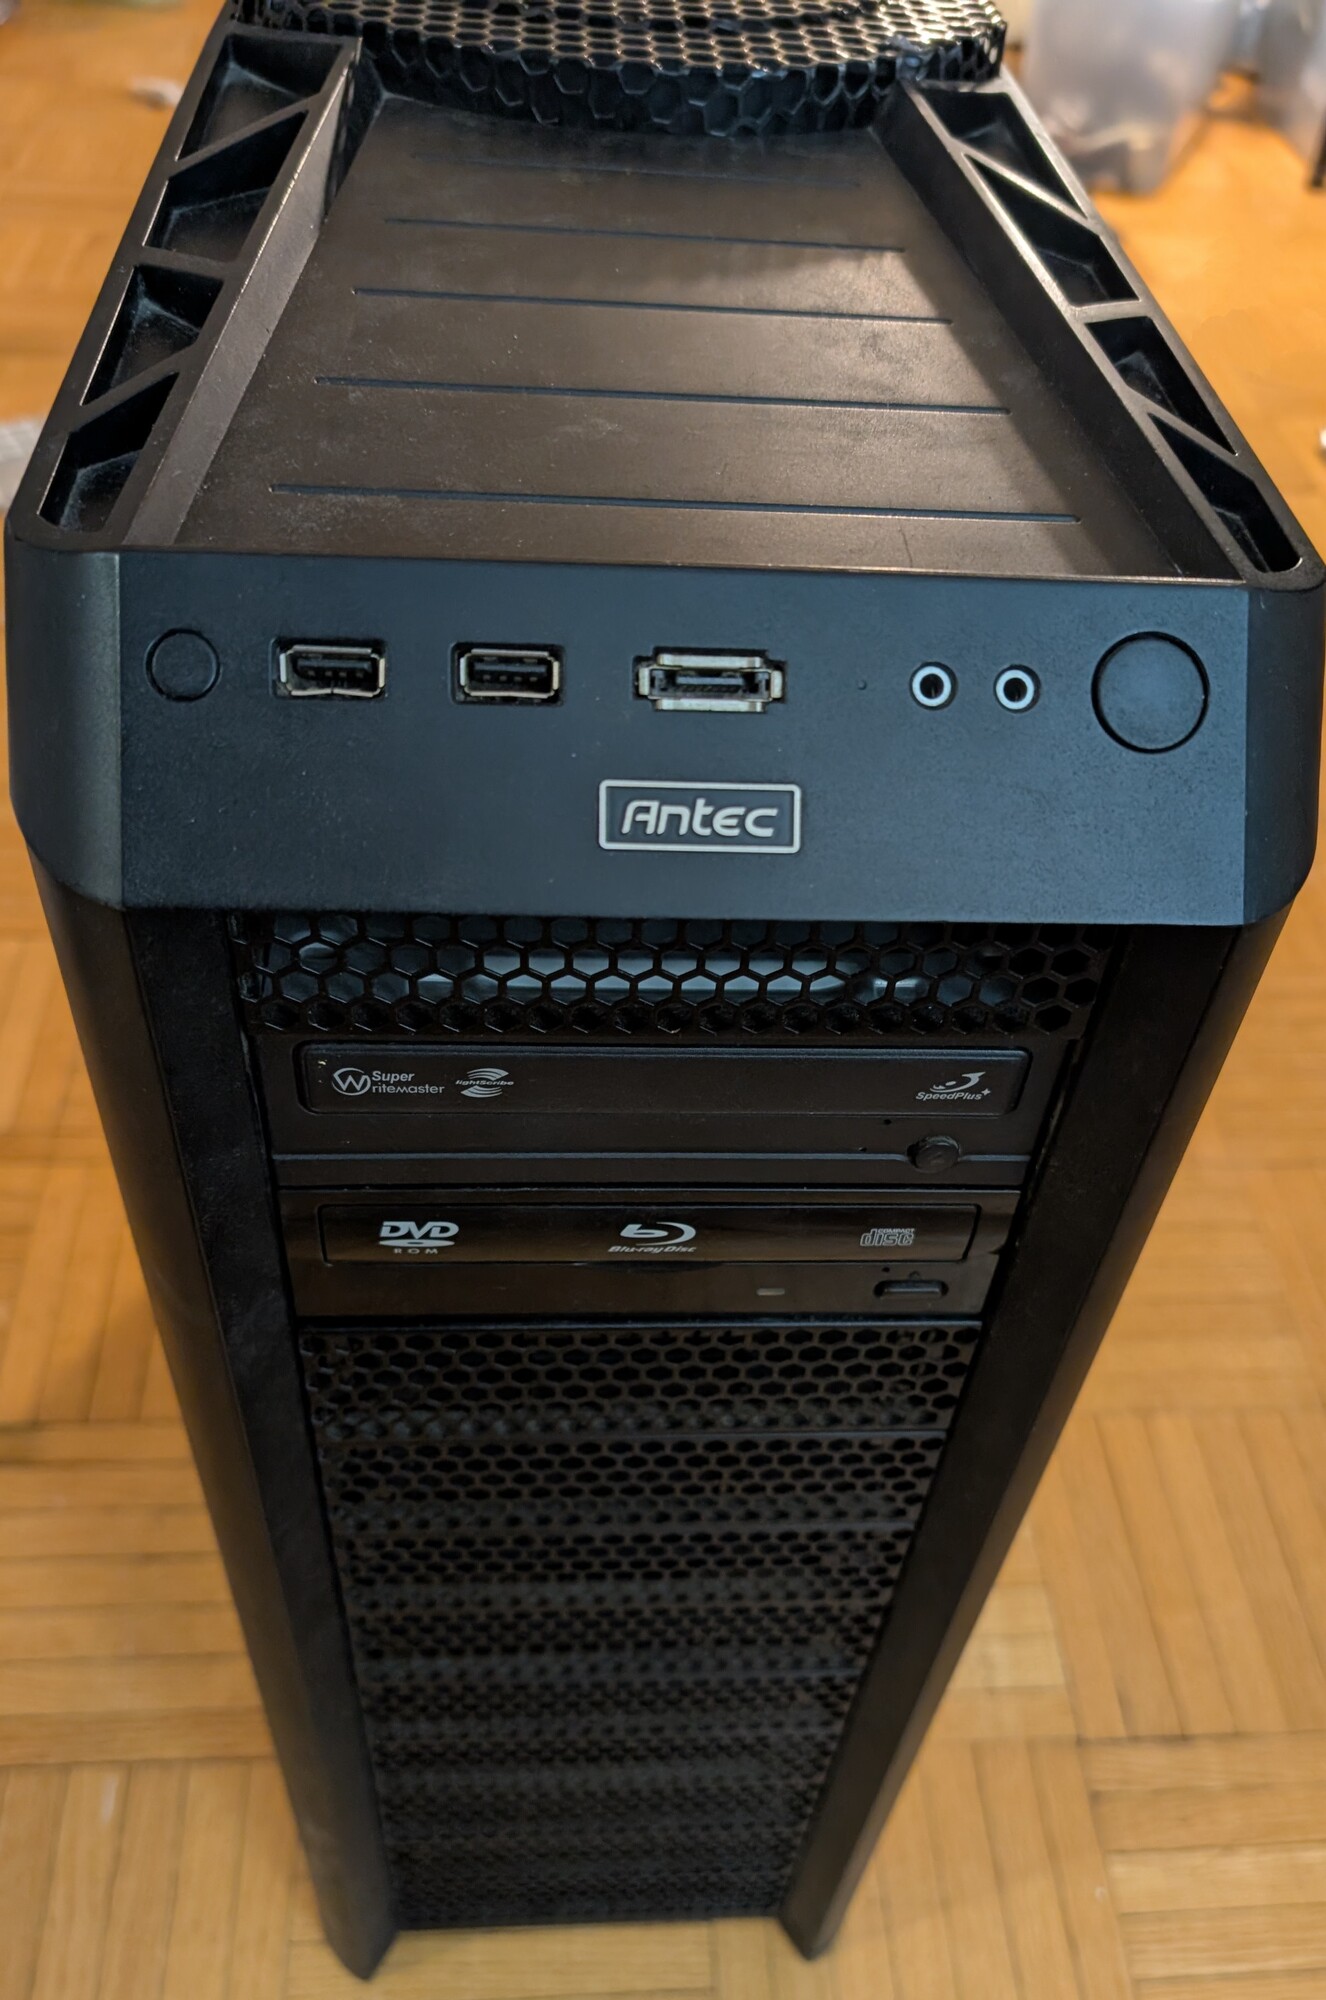
Introducing the Antec 1200
The Antec 1200 is an ATX full tower case first released in 2008. It contained rooms for twelve 5.25” bays, which probably explained the name. It’s the cousin of the Antec 902, sharing the exact same top design, but that case only had nine bays. The Antec 1200 came with three drive cages, each containing exactly three 3.5” drives, taking up three 5.25” bays each, for a total of nine drives with these cages. Each drive cage contained a 120 mm fan and a washable filter.
On top of the case is a front panel containing two USB 2.0 ports and an eSATA3 port (which were replaced by three USB 3.0 ports in the V3 version, but I have the original), and then a huge 200 mm fan inside a circular honeycomb mesh. At the back, there were two 120 mm fans next to the motherboard rear I/O, and the standard 7 full-height expansion card slots. Next to the expansion card slots were two rubber grommets to run tubing for a custom water cooling loop, if you were so inclined. At the very bottom was a spot for PSU.
The Antec 1200 I got was actually part of a full system that I managed to acquire. It was a high-end system back in the day, containing a first-generation Intel Core i7 CPU (Nehalem architecture), first released in 2008. It was the kind of system I dreamed of owning during its heyday, though in 2025, it was laughably obsolete and likely performs worse than a new phone.
The system I got wasn’t the stock configuration for the Antec 1200, but somewhat modified. The harsh blue LEDs on all the fans were removed, resulting in a more sane look. The lower of the two rear fans was replaced with a 120 mm AIO cooler for the CPU. The bottom drive bay also lacked a fan that was supposed to be included in the stock configuration. The side panel was also not the stock version with a fan mount, but rather a full acrylic piece that showcased the entire interior of the computer.
For fun, I powered it on and was greeted with a BIOS setup screen straight out of the 90s. Instead of a modern GUI with mouse support on so many motherboards these days, it looked like this:
        CMOS Setup Utility - Copyright (C) 1984-2010 Award Software
╔══════════════════════════════════════╤═══════════════════════════════════════╗
║                                      │                                       ║
║                                      │                                       ║
║  ► MB Intelligent Tweaker(M.I.T.)    │    Load Fail-Safe Defaults            ║
║                                      │                                       ║
║  ► Standard CMOS Features            │    Load Optimized Defaults            ║
║                                      │                                       ║
║  ► Advanced BIOS Features            │    Set Supervisor Password            ║
║                                      │                                       ║
║  ► Integrated Peripherals            │    Set User Password                  ║
║                                      │                                       ║
║  ► Power Management Setup            │    Save & Exit Setup                  ║
║                                      │                                       ║
║  ► PC Health Status                  │    Exit Without Saving                ║
║                                      │                                       ║
║                                      │                                       ║
╟──────────────────────────────────────┴───────────────────────────────────────╢
║ Esc : Quit                ↑↓→←: Select Item        F11 : Save CMOS to BIOS   ║
║ F8  : Q-Flash             F10 : Save & Exit Setup  F12 : Load CMOS from BIOS ║
╟──────────────────────────────────────────────────────────────────────────────╢
║                                                                              ║
║                       Change CPU's Clock & Voltage                           ║
║                                                                              ║
╚══════════════════════════════════════════════════════════════════════════════╝
Ah, the memories it brought back…
Either way, the entire system inside had to go out, along with all the dust that accumulated from the previous owner. I took apart the machine completely and removed every removable part of the case and vacuumed up all the dust inside. That took quite the effort.
Fan replacement
The biggest modification I had to do to the case was replacing all the fans. After 17 years, they were quite noisy and no longer in good shape. The Antec 1200 was also designed in an era before PWM fan control. Instead, all the fans were powered through Molex connectors, and to control the fans, potentiometers were connected to the fans, with the knob sticking out of the front mesh for the front fans that you could turn to tune the fans manually. The rear and top fans were controlled from the rear with hardware switches, also connected to the fans. This was a mess. I’d much rather have the motherboard automatically control the fans based on the temperature and workload.
Rather than waiting for the fans to inevitably fail and tolerate the noise in the meantime, I decided to just replace them when it wouldn’t incur downtime. So I bought a set of five Thermalright TL-C12C fans to replace all the 120 mm fans and install another fan in the bottom HDD cage to better cool the drives. Replacing the 120 mm fans was a fairly simple operation, though the case did show its age in an unpleasant way.
You see, the drive bay fan mounts had this plastic piece that sticks into the mounting holes of the 120 mm fan, and it had a hole inside to accept a screw. This allowed you to mount the fan to the front of the drive bay before attaching the front portion to the rest of the drive bay. Unfortunately, those thin pieces of plastic proved easily damaged, and the mere act of screwing in the fan caused all the little plastic pieces to shear off. At least the fans were held in place tightly once the drive bay was assembled, so it was no great loss.
The top 200 mm fan proved to be a lot trickier due to it being a custom part. The fan had a super thick rim that was exactly the same size as the top fan mesh, and there were several random screw holes that attached the fan to the case. I bought a Thermaltake CL-F015-PL20BL-A, which looked like it might fit, but it ultimately didn’t. I had to saw off the corners on one side to get it to fit inside the mesh, which created microplastic dust that probably wasn’t very good for my health. Then, none of the screw holes ended up aligning, so I had to hot glue the fan into place. In retrospect, it may have been wiser to keep the top as it was.
Also, if any case designers are reading this: please don’t have custom fan shapes in your case. It’s clear that Antec wanted a circular fan grill on top for aesthetic reasons, which necessitated the custom shape, instead of a square one that could have fit standard 200 mm fans.
Fan placement
An interesting consideration was which fan slots to populate. The instinct might be to populate all fan slots, but that would also create a problem given the Antec 1200’s design.
As previously mentioned, to keep dust to a minimum, maintaining positive pressure is essential. Given that there were two rear 120 mm exhausts and a huge 200 mm top exhaust, but only three filtered front 120 mm intakes, the case would have negative pressure if I had populated all the fans.
To solve this problem, I decided to run only a single 120 mm fan at the back instead of two, while running the front intakes at a much higher speed than the other fans for positive pressure inside the case. Given that the server isn’t running a power-intensive GPU, the cooling was more than sufficient.
Missing accessories
There were several accessories missing when I got my Antec 1200:
- The long screws used to attach 3.5” HDDs to the drive cage. I was able to identify them as 6-32×1” machine screws and buy some replacements;
- Some of the drive bay thumbscrews, which I replaced with regular M3 screws;
- A 3.5” external drive adapter that allows 3.5” devices with a front panel to be installed, e.g. a floppy drive, a Zip drive, or a card reader, which I don’t plan to use;
- The two 5.25” drive bay covers, which forced me to install some old optical drives to cover up the front; and
- A fan bracket that allowed a 120 mm fan to be mounted inside a drive cage where the drive would be for additional cooling, which I found unnecessary.
Rebuilding the server
Now that the Antec 1200 was modernized with new fans and cleaned, it was time to move the server over from the nameless case. So I picked a night when there was very low traffic on my mirror and powered down the server. I apologize for the downtime if you noticed it.
Due to a lack of space inside the old case, I opted to move all the hard drives over first. It was there that I ran into the first snag: while all the Seagate IronWolfs were moved over without issue, the WD Red Pros were missing the middle set of side screws4, resulting in only the front of the drives being screwed into the drive cages. Fortunately, because the drive cages have metal flaps for the drive to sit on, the drive is resting stably inside the case anyway, though the back could pivot up if a force is applied.
After mounting the drives, I moved over the PSU. Due to the compatible nature of the ATX, the PSU fit perfectly. However, due to the lack of a bottom intake, I had to mount the PSU with the fan facing up. Also, due to the lack of a PSU basement and the non-modular nature of my PSU, there’s a bunch of cable clutter, but I don’t really care.
I then moved over the motherboard, which also fit without issue thanks to ATX. However, I did have some trouble plugging in the EPS 12 V cable from the PSU due to the height of the case causing it to not reach, but it appeared the original system suffered from the same problem and there was an extension in the original system that I reused.
With the motherboard installed, I plugged in the front panel audio5, USB headers, and all the fans, which was a surprisingly easy task. Inside ATX mid-towers or smaller cases, that was always a struggle due to how close the headers on the motherboard were to the edge of the case, making it super difficult to get my hands in there. Due to the additional height of the Antec 1200, there was a lot more space and this ended up being the smoothest experience I’ve had in ages.
Due to wire length issues, I ended up plugging the rear fan into the AIO pump header. I had to override it in the UEFI to configure that as a PWM fan and set up a fan curve manually, but it worked just like a regular fan after that.
Interestingly, the Antec 1200 didn’t have a power LED, because the obnoxious blue lights on the fans were supposed to serve as power indicators, according to the manual. Since none of the replacement fans had lighting, I’ll just have to settle for looking at whether the fans are spinning or not to see if the system is powered on. I also didn’t bother plugging in the eSATA port, since eSATA hasn’t been relevant for a decade at this point.
With the system all wired up, I turned it on and it booted normally. I set up the fan curves in the UEFI configuration and the server was all good to go and booted back up as if nothing happened.
Result

I apologize for the cable management.
Conclusions
The Antec 1200 is still a great case for a modern NAS with its drive bays and good cooling. After replacing all the fans, the system was surprisingly quiet—even at full load—while having great cooling. When the system is mostly idle, I could barely hear it, while it was slightly audible at full load, though it still sounded pleasant and not distracting.
There are just several small downsides due to the age and design of the case:
- The little plastic pieces for mounting the drive bay fans have begun to fail;
- The lack of a bottom intake for the PSU forces it to pull hot air from inside the case instead of cold air outside, which hurts cooling;
- The top 200 mm fan was very hard to replace due to being non-standard;
- The front I/O is outdated, notably missing USB 3.06;
- The drive cages are not fully compatible with modern 3.5” HDDs; and
- The case will not fit the biggest GPUs currently on the market.
Overall, I am pretty happy with this. It certainly saved me a lot of money compared to buying a new Meshify 2 for $200 CAD, given that the fan replacement only cost around $56. Given that it was Earth Day recently, I’ll also say that it’s better for the environment to reuse a perfectly good case instead of buying a new one.
Notes
-
For simplicity’s sake, I’ll ignore all the smaller ATX variants, like microATX, mini-ITX, etc. This post will only concern itself with full-sized ATX motherboards and cases. The same logic applies to the smaller sizes, with the caveat that the case has to be at least as large as the motherboard for it to fit. ↩
-
This is the array that I am using to mirror larger projects with a lot of cold files, as well as storing LLMs locally. The commonly accessed files are cached in the SSD via
lvmcache, while the remaining data gets stored on slower HDDs. In practice, it performed reasonably well. There was just one problem—since I wasn’t holding “important data” on it, I decided to use RAID 0. Well, I had a SMART warning on one of the drives and I replaced it while replacing the case. I then had to rebuild the whole RAID array, which was deeply unpleasant. I opted to use RAID 1 on the newly built array just to save myself the trouble of rebuilding it again. ↩ -
eSATA was an old way to plug an external drive into the system that was a lot faster than USB 2.0. Unfortunately, USB 3.0 soon showed up afterwards, was just as fast, and could also send power, which quickly rendered eSATA obsolete. ↩
-
After checking the relevant standard, which is SFF-8301 for 3.5” drive dimensions, it appears that only the front and back side screws are standard, whereas the middle screws appear to not be. Apparently, to fit in more platters inside the drive, drive manufacturers decided to sacrifice compatibilty with the non-standard hole. Unfortunately, a lot of cases and drive cages used the front and middle screws… This was irritating, but wasn’t a dealbreaker. ↩
-
The Antec 1200 was from a transitional period between two front panel audio standards, the older AC’97 and the modern Intel HD Audio (HDA), and as such, had a connector for each standard. Since I am using a modern system, I obviously connected the HD Audio. The nameless ancient case only had AC’97 and the front panel audio probably never worked right, but I wouldn’t know—I don’t use front panel audio on a server. ↩
-
I could get a 5.25” bay front panel with a bunch of USB ports and maybe even some card readers, but I decided that wasn’t worth it. ↩